
DIGITAL PHOTOGRAPHY: How to Organize Your Inventory
Organizing digital photos isn’t necessarily fun, but if you’ve any volume of them, it’s necessary.
If you’re anything like me with a digital camera, you take a lot of pictures hoping for that one really good one or few, in each batch. In the interim, there are lots of keepers, and for one reason or other you might want to find them again. The more photos you take, the more desperately you will need to stay on top of organizing them when you first file them away in your computer, or it will mushroom on you. Organizing digital photos is part of what the graphic design industry terms “digital asset management”, although it involves more than that, but organization is key.
This post is about photos from digital cameras being stored on a laptop or other PC. Trying to organize photos on a phone or tablet device is different as they are not quite as user-friendly (or dumb it down to do it for you assuming you never want to edit them and make them very difficult to access for that purpose), and are best to be figured out on forums or tutorials specific to your device.
My system probably isn’t the best, but it works for me, and you have to be flexible and alert to your own particular needs, but I have a base that is scalable for just about anyone.
Number one thing, to house your photos in an area separate from all the other guck on your PC, create a folder called Photography. That’s level One. You’re going to make many more, but they all go in there. If you also use and store stock photography from online that you’ve purchased, by all means, make a MyPhotography folder instead, or in addition, in order to differentiate.
Digital cameras typically assign file names and sequential numbers to their photos, and sometimes put them in folders that are numbered, before you ever copy them to your computer. However, those names don’t describe what’s in them, and what those folders contain are not necessarily all the same kinds of photos (you may have taken photos of your kid’s play, that car part you need replaced, and a bunch of other unrelated stuff, all within one folder, because they are often by date and we rarely have days where only one thing happens). So those need to be in separate folders to find them again. The good news is that you are not bound to the organization that these relatively useless camera-generated file and folder names impose on you. There’s nothing really relevant and meaningful in those names and that arrangement; they’re mere placeholders, and you will forget where certain pictures are, wandering about in a bunch of odd numbers. If you haven’t already, figure out how to rename files on your computer (sometimes just clicking or right-clicking will lead you to the option). Sometimes I leave a tad of the original folder number or filename, in case I forget what I had already uploaded by the time I grab more off of a large photo disk (I don’t like to delete old folders off of photo disks before I’ve backed up my laptop).
Organizing Process
When I’ve just uploaded a disk to my laptop, right away I sort through the pictures to identify what categories they are, and rename the folders accordingly, and create/name new ones and move appropriate photos to them, to accurately reflect what photos are in each folder. Do it as you go, because if you let it pile up and you’re a prolific photographer, amateur or not, it will snowball on you!! Often I include, in the new name, a truncated notation of the year and month, as well as an abbreviated hint as to the folder contents. Now, all individual photos don’t get renamed unless they’re really good ones – you could waste a lot of time doing this for every single photo, but every single one won’t be worthy: …oops, took a picture of your feet by accident between photos of the kids playing ball. Well, you should actually delete that one; save space on your drive for good ones. On my Mac I view whole folders at a time in icon view, bumping up the size of the thumbnails so I can get a real feel for the composition. From there I can add an “a” to the front of the filename of each individual image I find that is exceptional, so they all go to the top together, making it easier to rename those special few when I’m ready, but more on that later. Big picture now.
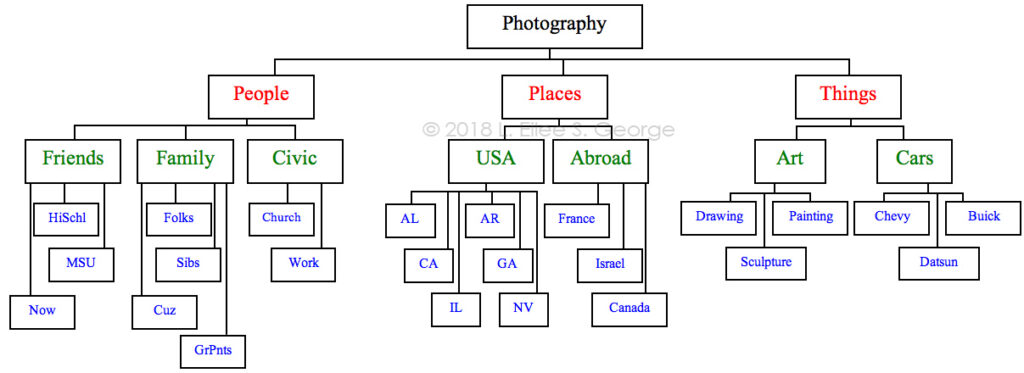
You can use this reference screen grab illustrating some of the organization I will be describing, for you visual learners:

If you prefer something of a flowchart, a simplified version of it might go a bit like this:
On with it.
Folder Hierarchies
Still, at first I had a lot of subcategories and not a lot of top-level organization. So I created, under the Photography folder, three Level 2 folders to sort things into: People, Places, and Things. Most photos fall into one of those categories. You could make more if needed (I did) but hear me out. Now, it’s probably not an exaggeration for me to say that I have over a million photos on my 2TB laptop drive. Insane, right? Okay; I own it. I have my own version of photo stock for my web clients’ sites, my graphic design, painting, music promoting and book writing resources, so it suits me. I’m also something of a family archivist. Obviously, with SO much going on there, the top three categories aren’t going to be enough to corral so much content, and retrieve what I want effectively. So under People (Level 2), I have folders with names of groups of people I know, and then under that, individuals within that group; then folders within those folders of different events with each of those people. For example, on the level under People, I have folders like Family, Friends, In-laws, Church, etc. – these represent Level 3. You can add what is relevant to you, like: CarClub, SoccerTeam, Workmates, or whatever else. Then on the next Level (4), say in the Family folder, I can list individual names like Mom, Dad, etc. Now, if it’s more than one person (which it often is), and a grouping that occurs a lot, I make bilaterally located combo folders (also Level 4), like MomNDad or NuclearFamily or GeorgiaCousins. You personalize it how it works for you of course. If there’s too much overlap, and you can’t decide between two equally appropriate locations, you can always commit to one, and in the second, make an alias or shortcut to the first folder, so you can find the photos in either place; cross referencing takes a little time on the front end but months later you’ll have saved hours trying to figure out where things are. Now, you can have another Level (5) under, for example, NuclearFamily, and have events like birthday parties and family togetherness. An example of a Level 5 sub-folder name would be 1988DadBdayLake, which right away tells you who and what event are featured, and when and where. With a name like that, I can later search file names based on any part of that folder name and find it and others like it quickly.
File Naming and Keywords
Now, say there’s a favorite photo in that little sub-folder that you really want to be able to recall. If the camera named it “IMG_3878.jpg”, that’s useless to you. You know it’s an image, and 3878 means nothing. Being sure to retain the extension, you could name it “DadCatSleepLap.jpg” and stand much better odds of finding it when you want it in a jiffy. I normally retain the 3878 part, discarding what’s before it because it’s the same for everything, but if I Photoshop multiple versions and place them in different places I can search for all of their locations at once, fast. Also, the cuteness of Dad sleeping with the cat asleep in his lap may have warranted more than one photo, and that number is conveniently already there, making that unique.
Going back to Level 2, if you recall, I had People, Places, and Things. Under the Places folder are sub-folders Colorado (where I happen to live and therefore take the lion’s share of photos), and EverywhereElse, where I put my traveling photos and visits to out-of-town family. Yes, there are overlaps between that and People, and I make aliases to navigate between these areas as a cross-reference. Hey, if bothering to do it at all, do it right.
How to make an Alias/Shortcut between folders:
On a Mac you make an alias by right-clicking on the folder you want to refer to, and choosing “Make Alias” from the pop-up menu that results; on a Windows machine it used to be about the same thing except it was called a Shortcut. I haven’t used a Windows PC regularly since Windows XP, so it could have changed, but try right-clicking to see what shows up. After you’ve created the Alias or Shortcut, you have to drag and drop it into the new location that you want to connect to it from, while leaving the original folder in its original location.
Separate the Good from the Mediocre
Sometimes I have lots of good pictures in a folder and don’t have the time to think of how to rename them all just yet, and just so I have them handy together to rename, I will simply change their filename by retaining all of the original name but putting the letter “a” in front of it, like this: “aIMG_3878.jpg” (that filename less the “a” being the default naming pattern by my Canon). Since the computer automatically lists photos in alphabetical order, all my favorites in that folder are now at the top of the list column, easy to find. Sometimes that’s enough, but it’s no help in searches from outside of that folder. If your filenames are numeric at the start; numbers will be above letters, so using a zero instead of “a” in front might behoove you better.
There are renaming applications and other programs you can use to facilitate this. Adobe Bridge gives you the ability to put the same metadata on a group of files as well as a renaming prefix that you designate. If you’re just renaming a few things this isn’t really necessary, but for bulk renaming these are great tools.
But this post isn’t how to use those programs. It’s about how to name things so you can find them and how to arrange your folders of information in a manner that’s logical to navigate.
Now, back to Places. You may have an EverywhereElse folder too, if it’s useful to you. If you travel both domestically and abroad, I’d then make Level 4 sub-folders of those. Then you can separate by country or state on Level 5 – whichever is appropriate for the place. After that you can separate by city, specific location, and/or date (and abbreviated detail) on Level 6, especially in cases of places you’ve gone to multiple times. Note that you may not need the same number of levels in different categories. Your Level 5 might not be a folder but be actual photos in a particular area, where a Level 6 doesn’t even exist there. That’s okay; this system scales up and down to all needs.
Filename Abbreviation Codes
I take tons of nature photos for paintings. Since I have so very much content on my laptop, and since I’m a tad obsessive-compulsive, I’ve developed a consistent abbreviated nomenclature in my filenames that uses partial keywords that I can search, in order to find all of the photos in that category. Let’s say I took a photo on Mount Evans that has mountains in the background, forest and a stream in the mid-ground, and a flower in the foreground. The camera-assigned filename we’ll say was originally “IMG_7211.jpg”. The new filename would include MtEv for Mount Evans, Mtn for mountains, 4st for forest (or Tr3 for tree if one is dominant), H2o for a water feature, and Flr for floral. It was originally from 306CANON folder, and was taken in May of 2014. All the photos in that folder would be in a folder renamed “306c14MaMtEv”and the file would be renamed “MtEvMtn4stH2oFlr211.jpg”. The 211 is retained because I may have taken 20 pictures within that folder that have those same features in different configurations, and they can’t all have the same exact filename. The folder name retains the 306 because I may have gone to Mount Evans 3 times in the same month and I’m remembering visit number two. The “c” (from CANON) after the 306 is just there to separate it from another number: the 14 representing the year. Note that in my ‘feature’ abbreviations, each starts with a capital letter and ends in a lower-case letter or number (e.g., Mtn, Tr3, H2o). This makes it easier to distinguish between each abbreviation when looking at the file name as a whole. I try to keep each to three characters but sometimes four are necessary to discern what the abbreviation stands for as opposed to another one. I do keep a cheat sheet of abbreviations to refer to in case I forget or develop a new one, so I always use the same one consistently.
The reason I do this is: if I need, or a client requests a photo for their web site or a painting, that has this or that feature, I can use the search feature on my laptop to key in these consistently-applied abbreviations, and quickly have displayed for me every filename on my entire computer that I’ve renamed that includes those abbreviations, without the litter of unrelated files hiding them. If someone wants something with mountains and water I can search H2o and get all the ones with water and easily focus on those that also have mountains by looking through the search results for ones that also contain Mtn. Just about on the spot I can see or show a client a bunch of thumbnails of relevant images.
You very well may not need that much detail, but it’s nice to know it’s possible if you ever DO need it.
Again, here’s that screen grab illustrating some of the organization I’ve described above:
And the (simplified) flowchart:
And so on and so forth; you know there’s more.
Of course you would add more to and under that, but this is a general illustration. For instance, under Painting one might want subfolders entitled Still Life, Portrait, Landscape, Abstract, etc. Under that level on Level 6 I arrange things like individual work by title, and even progress photos while making each work – usually for more complex things like paintings, sculptures and furniture designs – not so much for drawings. As I’ve said, you will need to tailor this method to your own priorities and content. You also may have to create some temporary sorting folders while you’re in the process of organizing things. Be patient with yourself; you’ll get there, step by step.
Sometimes organizing large amounts of data is daunting, but if you stop and think about how it is identified, that is truly the key to organizing it by category.
Some other abbreviated nomenclature that I use for filenames are: Nat for nature, Aml for animals, Txr for textured background shots (like for wallpapers), Cld for clouds, Cty for city shots, Rok for cliffs, bluffs or large rock formations that are dominant, Rd for roadways, Sno for winter shots, Roz for roses (since a lot of my flower shots are roses; we have quite a few growing in our yard), Bld for buildings (architecture), Brk for bricks, Brj for Bridges, Aut for fall scenes, Spg for spring and Smr for summer, Brd for birds, D3r for deer, B3r for bear (yes we see them occasionally), and so on…. With generally 2-3 letters, you must choose so that it doesn’t look like another word, so choose wisely. Windows machines, as I recall, are fussier than Macs with file/folder name lengths, so this is where the extreme abbreviating comes in (and why I don’t use spaces). Years only need be 2 digits. Months I abbreviate with 2 letters: Ja Fb Mr Ap My Je Jl Ag Sp Oc Nv Dc. You could easily mix up the J months – but note that the second letter is one that no other J month possesses in its full name. Sometimes I’ll even note a dominant color in a photo if there is one, especially floral shots: Rd, Ylo, Blu, Grn, etc. because some clients will choose things based on color, whether it is to go with their logo or their bedroom curtains.
Obviously you can pick and choose from these methods for what you actually can use. I just wanted to present as many examples as I have found useful.
I hope that with your dedication, your photos become more organized than this post! Photos are great when you can find them. Happy shutterbugging.
♥ – Eilee
All content on this site © 2013-2020/present L. Eilee S. George, all rights reserved.