Fine artists and math aren’t usually friends. Math is a necessary evil at times, but visual and wordy creative types generally avoid it. (And for those of you who know my fanaticism concerning grammar and spelling, yes, the title above was intentional, and no, I do not have a fever. I do however suffer from a fascination with terrible puns. And no, there isn’t any other kind of pun.)
However, math skills are incredibly useful in many areas of drawing, painting, printmaking, sculpture and more. Linear perspective is based on mathematical relationships, lending realistic proportions to depictions. It translates into sculpture getting anatomy in proportion; into fashion design measuring for pattern sizing. Ancient cultures, Michelangelo, and modern artists alike utilized measuring and drawing grids for enlarging paintings. Mathematical volume ratios are important in timing and recipes, from acids for etching printing plates, to mixing paints, to formulating ceramic glazes and kiln temperatures and firing times.
I didn’t like math much, except geometry. It actually has saved my art projects on many occasions. It isn’t just figuring square footage for a rectilinear wall (length x width) before you buy too much paint. It can be handy to figure out the perimeter of various shapes depending on a project’s needs, and you may not be able to predict all the needs you’ll have in future projects, so it’s good to already have a working knowledge of math embedded in your grey matter before a problem crops up (especially if you’re under a deadline).
The point is, for example, at this particular juncture you don’t know how big the circle is or the radius or diameter from the info you have right in front of you. This is how you find out. Once I had a project into which I had to figure out how to fit a circle exactly between random elements that were not making it easy to just measure a diameter; the three places crowding into the space formed a triangle. Using my existing knowledge of geometry, I could figure out the precise point at which I needed to place my compass point, based on a principle that didn’t even require actual measuring. No measuring? Cool. I did have a couple of extra steps because the space was already halfway enclosed and I did have to take measurements to recreate a triangle from those three points to get the angles right, but I’ll start by the main concept, which, barring such constraints, really requires no measuring.
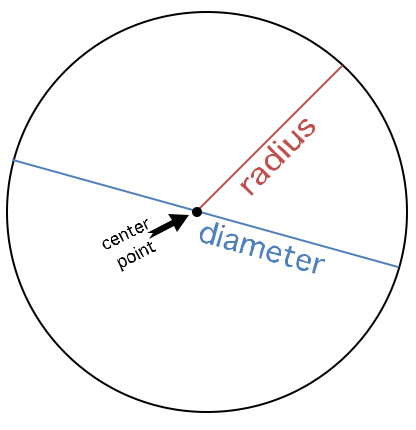
First, some basic vocabulary, like you need to know that straight line segments connect singular points. Simple enough. Then you must understand what perpendicular means: that would be a line that is exactly 90 degrees difference from another line. Then you should know that “bisect” means to cut in half. Also know that the center point of a circle is theoretically where one could put a compass point to adjust the business end to scribe a circle around it, and the distance between the circle’s edge to the center point is called a radius, and the distance across the widest part of a circle from edge to edge is a diameter. Sorry if that seems a little too elementary, but I’m trying not to assume too much (I haven’t limited who visits here other than spammers and other mischief makers).
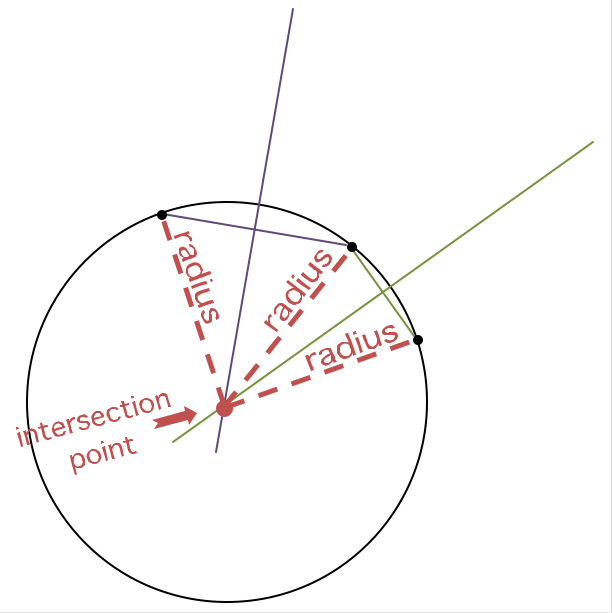
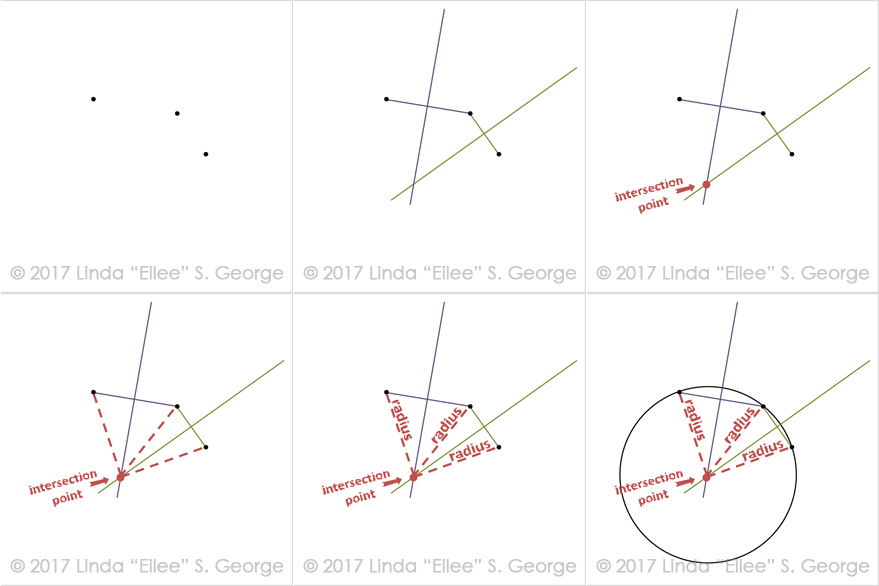
That introduction should prepare anyone for the following rule: the center point of a circle that will pass through all three of any three points (in any orientation to each other) may be found by determining the respective perpendicular bisectors of two line segments connecting any two pairs of the three points, and locating the intersection of these two bisectors. For example, on Figure 2 one line segment paired with its perpendicular bisector is in purple, and the other pair is in green; where the green and purple bisectors intersect is where you put your compass point; adjust it to the span between that point (the center point) and any one of the random three points, and you will see that the circle drawn with that radius will pass through all three of those points.
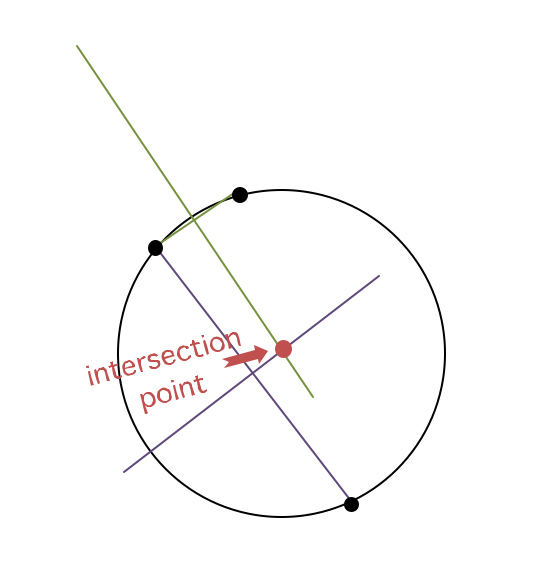
Now, your three points can be in any proportional orientation to each other; they needn’t be lined up anywhere close to a regular sequence as they nearly are in Figure 2 above. Alternatively, as in Figure 3 here, two points can be rather close to each other, while the third is relatively distant, yet you will find that the principle of the intersection of perpendicular bisectors functions every bit as accurately with any configuration for finding that common radius at that intersection point. You’ll notice that the intersection seems to be more “between” some of the points in this second example; whereas before, it seemed more “outside” of the area of the more lined up points. And that’s okay, either way.
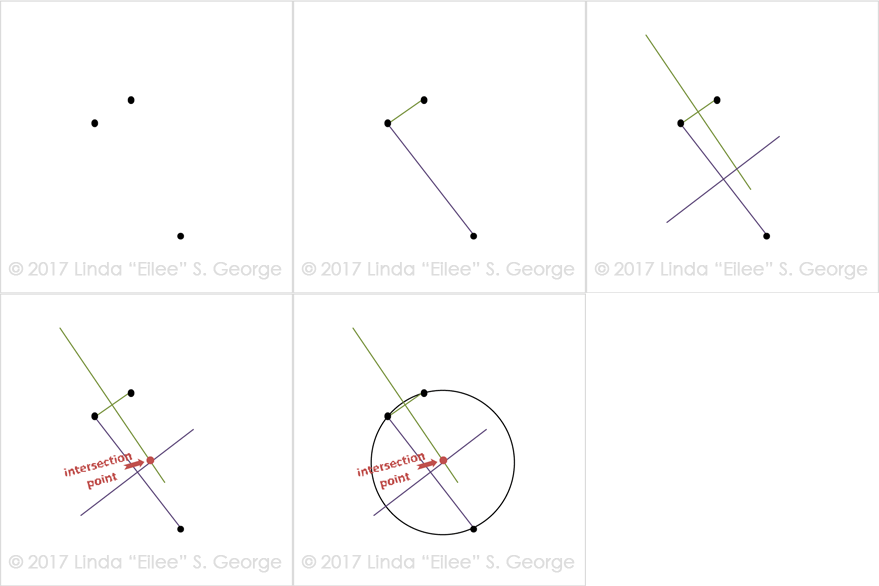
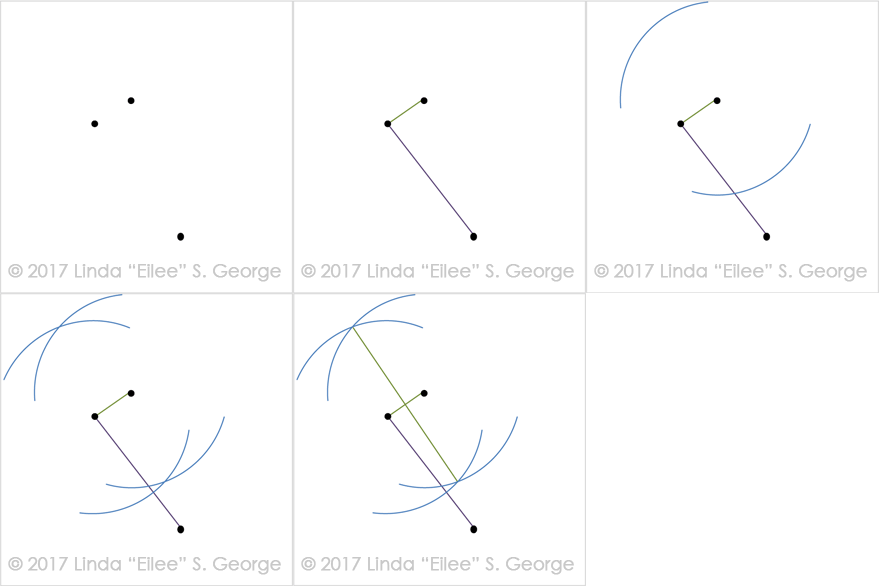
So…how does one determine that perpendicular bisector? Well, there’s always measuring it out, which is a fat pain in the neck, but the easy way is with any straightedge and the compass with its pencil. Even if all you have is a piece of scrap paper, you can fold it over a few times and the fold will make a nice straightedge if you don’t abuse it too much. You don’t need a ruler with measuring marks, and you don’t actually have to calculate anything; the laws of physics do the heavy lifting, and you’re just an apparatus. So let’s try it:
1. Draw a line segment between any two of the three points.
2. Draw a second segment between (either) end of the first segment (since you only have the two choices left), and the third point.
3. The same procedure for finding the perpendicular bisector (steps 4 through 7) will be applied to each segment, so choose just one to perform it on first.
4. Stretch your compass just a little farther than the length of line segment #1. A distance that could produce a nearly equilateral triangle would be sufficient distance to get a good bisector length.
5. Place your compass point on one end of the segment.
6. Estimate about where you think a perpendicular line would pass on both sides of the segment and mark an arc (just part of a circle) lightly but generously in that vicinity, to be sure it crosses it on both sides fully. Do not readjust your compass after making these lines. Figure 6 may help you see what I mean on placement.
7. Repeat the arc process from the point on the other end of segment #1. Again, don’t readjust your compass by mistake; these arcs must be equal from either side to stay centered. This will produce a little “X” on either side of segment #1. Drawing a line that passes right through those two X’s will be the perpendicular bisector of that segment.
8. Now repeat steps 4 through 7, only for (whichever your choice is for:) segment #2.
Now if you have a physical project that you needed a circle shape for, you can cut out the circle you just made, and use the circle itself (either it, or use the hole it left in the paper or cardboard you cut it from) as a drawing template. Cut it out of chipboard or whatever and it’ll be a little sturdier than just on paper, but a little harder to cut out. Or match a circle template to it if you can…you may not be able to, though, since available sizes of templates are so limited. If you’re an adult, I suggest cutting it out carefully by hand with and X-Acto knife instead of scissors if you can (but kids, DO get help from an adult; X-Acto type art knives are notorious for slicing even adults if one isn’t very careful and steady), or if you’re lucky enough to have a circle cutter, go for that if you’re working in wood. (It bears mentioning that in every school, furniture, design or model building shop I ever worked in, these art knives had way more accident reports than any of the power tools! Don’t be overly confident; be extra careful!!)
My project for which I first had to use this knowledge had a key area that was very difficult to access, because other elements were already in the way to just being able to measure easily. Knowing the (perhaps obscure) three-point rule about circles was already in my brain, patiently waiting for a use when I found I needed it. It paid off!
But sometimes you’ll need actual measurements for a triangle. The thing one has to remember is that any 3 points (that can locate a circle) also makes a triangle, and all triangles have 3 sides. Those sides (like the segments we made in the last exercise) have center points, (and therefore, they have perpendicular bisectors). Triangles also have 3 vertices (vertexes if you prefer), or corners, and no matter what proportion the triangle is in (right, obtuse, scalene, equilateral, isosceles; whatever), those 3 vertices always total 180 degrees when you add their angle measurements together. Always! And that means that there is always a way to figure any single unknown measurement, so long as you have the degree measurements of at least 2 vertices, or of at least 2 sides. This is why the Pythagorean theorem works for right triangles; but I’ll explain that later. Don’t worry: the formula is almost easier than the pronunciation. (You can scroll down to Figures 8 and 10 for triangle references, where these two triangle paragraphs are expanded upon.)
What if you don’t have a right triangle? Well, how much info do we have? Is it enough? You pretty much need measurements of 2/3 of the sides or 2/3 of the vertices degrees to get that last third of either. There are ways to do combinations of a vertex and a couple of sides and things like that, but I have neither needed that combination nor have I any recollection of how to do it, and it’s late and I’m too tired to look any of this stuff up; I’m going purely on memory in this whole post…literally from decades past.
Practical Applications
You might wonder why we even want to know any stuff about sides. Well, if you’re edging a shape with some sort of trim, you’d need to figure out the perimeter measurement, or the distance around it, so you’d know how much yardage/board footage (or other type of length) of trim to buy. If you’re painting a big shape, you’d want to know how much paint you’ll need, and need to calculate the area of a shape. Most containers tell builders or DIY remodelers how many fluid ounces or gallons or whatever they contain; some will say how many square inches or feet or whatever that liquid volume will cover…but they may not. And having far too much or too little is often a problem if you fail to plan. Paint can get pricy, and it’s bad for the environment to waste it and many people don’t even bother to look at recycling. So waste not!
Area, a measure of the surface of a two-dimensional entity, is good knowledge for many things: ordering sod for your yard, or raw canvas to stretch z number of q sized stretched canvases plus their borders, or concrete for your patio, or to help calculate how much x number of cows will eat grazing a pasture in y amount of time before you have to rotate them to a different pasture and let the other pastures grow again for the next round. Cows? We’re talking about cows? Heck yeah! Math is super useful in almost any topic. So there are formulas to help us figure this stuff out for almost any shape, even if you have to take a big weird shape and break it up into smaller components that are easier to define and then add it all together.
Quadrilaterals, Triangles and Circles
I guess I’ll start with quadrilaterals, or four-sided figures; they’re the easiest. Perimeter for a square would be S x 4, where S stands for Side. For a rectangle it would be (length x 2) plus (width x 2), or L2+W2. For a parallelogram it would be the same as for a rectangle, and for a rhombus, perimeter formula would be the same as for a square…but not so for area.

The area (A) of a square or rectangle is simply A=L x W. For a rhombus, you measure the lines connecting the opposing corners and multiply those: A=D1 x D2 (D stands for diagonal). For a parallelogram it’s a liiiittle more complicated, because you kind of break it up into components, one of which is a triangle, so I’ll shelf the parallelogram and teach you about triangles first, with a quick detour to trapezoids in between.
Triangles are nearly their own field of study and I do believe that relates to the term “trigonometry”. All I remember from trig is how to figure the sine, cosine, and tangent, and I’ve not yet had practical cause to use it, so I’ll skip that for my audience. We’ll concentrate on perimeter and area.

The perimeter of any triangle is just derived by adding the sides’ values to each other. The area, however, is obtained by using the formula A=½ h(b); in other words, area equals ½ times the height, times the base (when you see parentheses in a formula, it means to multiply the value within and the values outside the parentheses…it saves confusion using the old-school multiplication symbol x alongside variables which also may look like x). It makes more sense when you look at a right triangle and notice that it’s like someone sliced a square (or a rectangle, or a rhombus) in half diagonally…base times height is a whole lot like length times width for a square…then you divide it in half, because it’s only half of the area of the quadrilateral it would fit in. ½ h(b). Picture that while looking at the different triangle types in Figure 8 above. So…what are height and base?
Well, you can take any triangle and assign one side (generally the bottom) as the base. From there, the top corner opposite that base is what determines height, but only if you measure on the perpendicular. It doesn’t matter if the height is directly over the base or hanging out in the “air”, as it might with an obtuse triangle. The height is always completely perpendicular to the base (see Figure 8 above, on far right; the obtuse triangle with the dotted lines; note how that also translates to the acute triangle in center).
Now I’m just going to give formulas for shapes, and if you have questions on how to execute them, please email me…or contact your local math teacher, who is probably (hopefully) far better at explaining this than I am.

A trapezoid at first seems like a Frankenstein’s monster of shapes, but its formula is pretty easy, kind of ripped off from the triangle, but it acknowledges measurements for a top AND a bottom base: A=1/2 h(b1+b2). You don’t double the height, because it’s still just one height. Note that the formula below the parallelogram in Figure 9 says “either base”, not “both”, because you only need ONE. Since they’re the same (they’re parallel and so are the sides that connect them), you can choose either one of them.

Right triangles of course have special rules all their own. In geometry they always have a little square in the corner reminding you that their angle is 90 degrees. The single side exactly opposite that right angle is called the hypotenuse. The example shown on the far left is actually an isosceles triangle (two 45-degree angles plus one 90-degree angle equals 180 degrees), but sides a and b could also be different lengths, and the other two angles can be different measurements as well (as they would necessarily be, what with having different length sides). For example, the triangle on the right has one 30-degree angle, one 60-degree angle, and the (right) 90-degree angle, again adding up to 180 degrees.
Right triangles are where the Pythagorean theorem comes in: a2 x b2 = c2. If a triangle with sides abc is a right triangle with c being the hypotenuse (the side opposite the right angle), where the number of length units a=3 and of b=4, and you don’t know c, you can calculate that using the theorem: a2 + b2 = c2, and a=3 so 3×3=9, and b=4 so 4×4=16, so 32 + 42 = c2, then 9 +16 = c2, then c2 is obviously 25, and the square root of 25 is 5. So 5 is the measurement of that hypotenuse. Obviously, the measurements rarely calculate so they fall into such neat round numbers; this is just an easy example. You can figure other square roots manually, but it is admittedly tedious; I highly recommend using a calculator for this component. Similarly, if you change the same proportion around so that b is the value missing instead of c, you can just subtract a from c to get b, or: c2–a2=b2, instead of adding like we just did.
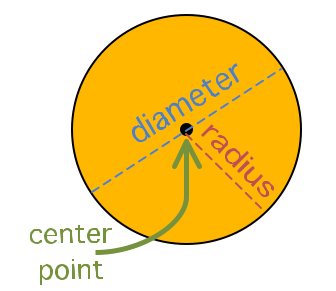
Hmm…we’ve done quadrilaterals and triangles quite enough. So back to circles – let’s do some actual math. One of the most “famous” formulas in geometry is “Pi R squared“, or πr2. In truth, that’s not a complete formula; it’s only half! You need to know what that combination yields. In this case, it’s the Area, so A=πr2 is the whole (balanced) formula. The A again represents Area; the r represents the radius, or the distance from the center point to any edge of a circle (and it’s the same distance to any edge of the same circle). Another useful formula for circles is for the Circumference, or the distance around the outside – and yes, basically it’s the same thing as perimeter for other shapes; “circumference” is just a specialized term for the perimeter of a circle. The formula looks a tiny bit like the one for Area, but don’t confuse the two: C=2πr or in longhand: Circumference = 2 times pi times the radius. (It really is quite different in function.) Now, anyone who’s paying attention will notice that 2 times radius is the same thing as (one times) the diameter, since the diameter is the distance across a circle at its widest, which necessarily runs through the center point…essentially, 2 radiuses. So you could alternately say π(d) and be done with it. Except, of course, until you need to plug in a definition for π (pronounced pi like the Greek letter). Pi is a “magical” circle-specific value represented by 22/7 – which, since those numbers don’t ever make human sense together, have a decimal equivalent something like:
3.14159265358979323846264338327950288419716939937510582097494459230781640628620899862803482534211706798214808651328230646…blah blah, random constant ad infinitum…but for most practical purposes, 3.14 is adequate. If you don’t dig doing immortal arithmetic using top-heavy improper fractions with anemic prime denominators, go for the decimal shorthand instead. I think I’ve done more with circles than with any other shape, save for squares…obviously.
Formulas For Forms
Artists also work with 3-D geometric forms as well as simply 2-D shapes. Remember from our art lessons on Forms that forms are essentially mere spatial extrusions or rotations of shapes, expanding 2-D to 3-D. Formulas abound for forms as well, but instead of needing formulas for area and circumference or perimeter, they need formulas for things like volume and surface area…things like for the sphere: V=4/3(π)r3. Prisms are easy; calculate the shape on the end and multiply by the height of the prism to get the volume of it. Surface area of those, you just calculate the areas of rectangular sides and add them all to the areas of each of the ends. Pyramids are 4 equilateral or isosceles triangles plus a square base for surface area. Volume for those is a little weirder. Cubes are made of 6 squares, so their surface area would be the area of one square times 6; its volume would be Length times Width times Height (LxWxH). Tetrahedrons are 4-sided forms with all equilateral sides. When you get into dodecahedrons, icosahedrons and the like, you’ve gone beyond what I’ve ever had use for personally, but there are mathematic resources on the web you can search for with any question – or, again, contact your local friendly math expert and he or she will likely be glad for the inquiry.
Grow Further from the Foundations
Of course, shapes and forms may not always conform to geometric proportions; sometimes they are organic shapes or forms (see lesson on Shape). But usually you can guesstimate parts based on similarity to a geometric counterpart…or five.
Now, you may be wondering…how on earth again can any of this be useful to an artist? I’m certainly not saying it comes up with every project. But when it does come up, it is good to be prepared, and know what you’re doing. I had to figure out how to draw proper gothic arches for my 3-tree triptych. I had to figure out perspective for Catreedral. I had to stay aware of paint to medium to water ratios in all of my acrylic mixtures so my paint didn’t lose adhesion viscosity effective in relation to the canvas or other substrates. I do commission work to fit in certain spaces in situ.
A lot of times it’s like my first example: you’re trying to fit an element into a composition with only part of the information you need to execute it, and you should know how to generate that missing information from what you do have. It can help you assemble 3-dimensional forms; it can help you understand proportion when drawing things either freehand or by perspective. It can help you organize radial or concentric arrays or grids in regular intervals to make patterns. It can be used in symbolic capacities. It can help you distribute elements on a certain shape and size of substrate. Perimeter and circumference are good for figuring minimum linear measurements for physical materials to wrap around the outside of a shape. Volume is good for figuring out how much resin you can fill a hollow form with, or how much airspace a solid one will take up, or how much water or glycerin it would displace if submerged; while area and surface area would let you know how much paint or flocking or whatever you would need to color or coat the thing with. When you get into large shapes or forms this sort of calculation takes on a more significant importance with budgeting supplies, as well as figuring sale price from a root of cost of materials, times your hourly rate, differentials, incidentals and whatever is relevant for your medium and project. It’s not always formulas; sometimes it’s understanding the theory and relationships behind the formula and applying it in a custom situation. I’ve gotten to the place where I know some of this stuff so well, I can visualize it accurately without doing computations, which saves lots of time with sometimes impatient or unrealistic clients.
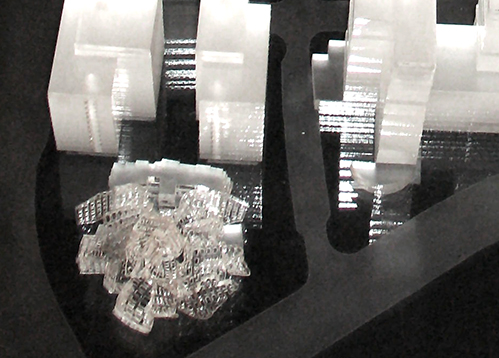
When I was an architectural model builder, I was given a rather challenging project: to produce a very quick small-scale context model of a building designed by a visionary architect named Frank Gehry…without any plans or elevations. I was to fabricate it from rigid, flat clear acrylic sheet, and manipulate it to match the feel of an existing context model. I had no access at the time to 3D printers, and clear media on those had not yet been developed. I had to figure out how to make a flat pattern, cut it on the laser cutter out of clear acrylic, and then carefully melt it into shape with a propane torch and tweezers to bend it into shape, but I needed a starting point that was viable, in a flat pattern I could cut out first on the laser cutter. I scrutinized a digital virtual model of this building, which looked, as some say, like a crumpled piece of paper, and then I noticed that the (thankfully ubiquitous) windows were of a certain ratio of proportion to themselves and between each other, and were laid out on a sort of grid, and I started twirling the camera angle in the file all around, (no idea who drafted it or how; stellar job though), counting in all the relevant directions, taking notes and creating a schematic. I ended up, using synthesized knowledge from my foundations in geometry, making a very faithful yet tiny model of that building that satisfied all requirements from my superiors and from the client. Geometry prowess made my deducing the pattern for it possible, and my job very well may have depended on it…I was after all running the model shop, and there was no one else to figure it out for me, or so I assumed; it was my job to do it. In general for all projects there I had to have a good handle on fractional proportions for making scale models to begin with. Math saved my proverbial posterior. Never underestimate the income value of the ability to analyze and solve.
If you prepare and have these geometric principles in your head already, you will be able to spontaneously formulate solutions to many future problems on the fly, without ever having anticipated this or that particular challenge prior to its presenting itself. In professional situations, clients are not willing to wait around for you to learn basic, practical information like math to finish their project; you should already know that stuff. That’s part of doing the job. And more jobs than you give them credit for it require very solid math skills for some aspect of it. A well-rounded artist is versatile – and by nature, a problem solver. Math, and particularly the user-friendly concrete geometry, is another essential tool in your utility belt.
It must be said that art should not be funneled down to graphic design applications, any more than math should be limited to what a calculator can do for you. What I mean is, get down in the muck (or paint or clay or hand ciphering) and do it manually; figure it out on your own, without a machine, because that is what it takes to get your brain to be really agile and useful in unpredictable situations. And hey, if an anti-tech dystopian society befalls us, you’ll have marketable skills that will fast earn your reputation as a person in great demand and of great success by default, since most dullards won’t be able to add two and two and come up with four without some microchip telling them so, or be able figure out how big a barrel to make to fit that low-tech washbasin in the corner of his hovel, let alone how much pitch to coat it with so it doesn’t turn his dirt floor to mud.
If you are frustrated with other academic subjects, and struggling to find relevance for them in your life, I do hope you take this post to heart as the first of many examples of how things are, in fact, connected, and how they can be made useful. Aspects and underlying concepts in different areas of knowledge can be synthesized quite usefully into other areas, informing your vocation in ways that are rich and multilayered, and propelling you (and your career) into deeper realms of excellence in your craft.
This sort of outside-the-box thinking is actually cultivated in studying the arts themselves, more than in other more common school subjects alone. This is also why I am more a proponent of STEAM schools over STEM (Science, Technology, Engineering and Math schools)…the “A” standing for “Arts”, of course…and that’s not just visual arts, but all arts, for they all stimulate and stretch the brain in unique ways: analysis, synthesis and evaluation over mere memorization, comprehension and simple applications. It’s the type of creative, often unstructured yet free and communicative thinking that fosters inventive minds and generates entrepreneurs, and that’s a pretty darn important bundle of skills these days. On that note, I encourage everyone to support arts education in all schools, because it enhances technology training in crucial ways that cannot be taught without the arts. Arts and the way they challenge our brain development will always be just as valuable to our culture as math, sciences and history, and as important as communication and social skills will always be, which we are relearning as a society, through recent backsliding and failures, that we still very much need to retain and sustain. Arts, in concert with technology and other sectors, will help us to preserve, portray and propel our culture.
♥ – Eilee
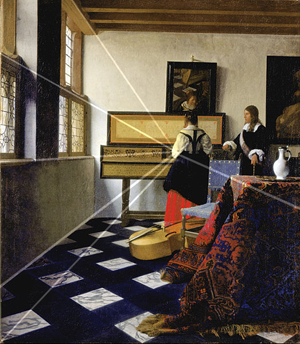
Look how real that space feels! Math is good, y’all.
Image (prior to my editing) courtesy of Google Art Project. Please email using contact form if issues with image.
All content on this site © 2013-2020/present L. Eilee S. George; all rights reserved.
