Hello…this is artist and teacher Eilee George. Here is Line: The Most Basic Element, the first in-depth lesson of my series on the Elements and Principles of Design, which I introduced in the previous post, Introduction to the Elements and Principles of Design, a glance at which you may find helpful, if you happen to be unfamiliar with these.
Line – In Theory:
Some would argue that a point is more basic than a line. I think of a point as a really short line or a really small shape; unless you’re going into Pointillism there’s no point to my pointing out points! I’ll leave that to Edwin Abbot’s Flatland for the geometrically- and philosophically-minded.
Lines, however, have a great deal more personality and use. Obviously they can be straight, curved, angular, fat, thin, dashed, frayed, or implied. They can outline things, which is probably how we all first used them with our fat crayons (flash back to: “What a nice tree, Honey” / “No, that’s Daddy!”) Lines can create a grid tracing over the contours of three-dimensional entities. Lines can be organized to create visual perspective. Lines can be placed in sequences to create the illusion of value. Lines can be combined in random or ordered fashion to achieve textures. Lines are used to design letters for alphabets to write language and communicate. In short, lines rock.
Line – In Practice:
A quick exercise I can offer you to illustrate some uses of line extending beyond the obvious is one I used to give to my Art I high school students. This exercise teaches not only a bit about line but also value. Value is the lightness or darkness of an object or background. One way that you can create light and dark values in an artwork is by using nothing more than lines!
On a reasonably large sheet of paper, lightly draw the outline of the objects you have set up in a still life on a tabletop (with the simplest objects that you have available), and place a strong light source to the left. Make sure your composition covers the entire page. In the example I show below, there are variations on the basic forms, for ease of depiction. (I know – we haven’t gone over form yet, but you have to draw something; these won’t overwhelm you, and you’ll learn more about form soon enough. You will also soon see how much these elements and principles overlap, and I will make sure you learn a few things at once.) Now, with your pencil, lightly draw two vertical lines dividing this drawing into three equal side-by-side sections. At this time, your drawing should look a little something like this:
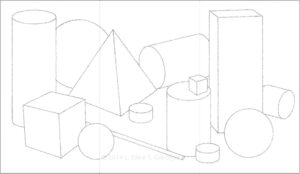
Please be kind to yourself and don’t expect perfection in your drawing technique. Certainly don’t compare your work to this example drawing, which I in all laziness generated digitally (later I will scan actual drawings in, for more complicated lessons that involve less mechanical shading techniques and so on). If you feel a need to use a straightedge and a compass or templates feel free, but it’s best to practice drawing freehand. A big hint to smoother lines, be they straight or curved, is not to draw with your fingers and wrists so much as to draw using motions from further away, like your shoulder – practice on some scratch paper until you’re comfortable if you like. Remember we have computers and printers to make mechanical-looking art. If you’re going to draw, let your art look like a human did it. There is true beauty in a little honest imperfection.
Now, in the left section, go over your refined outline in your choice of ink – and then do nothing more to it. Just stop your outlines right there at your vertical pencil border, don’t close in the empty ends of shapes; just stop there. (Note: it will look more interesting, by the way, if your borders bisect objects in the composition, rather than only fitting objects tidily in groups between the borders.) In the center section, using only vertical lines, place the lines so that they simulate the illusion of light and shadow by putting them closer together or further apart. The closer together the lines are, the darker the area will look. If the object is curved, some vertical lines may start and stop several times; that’s just fine. It’s also okay if you use a ruler, if you’re not comfortable drawing straight lines freehand – but again I encourage you to practice drawing them freehand, because you won’t have templates for all different kinds of lines! Once that middle section is done, move on to the right-hand third. Here, you will be using lines in a similar fashion to “shade” your still life, but this time you’ll be angling or even curving them appropriately, to show the shape and “direction” of each individual object. If you are drawing a cube, the lines will likely be straight, but may be diagonal, to show relation to, or opposition to, the direction the light is coming from. Let your instinct guide you on your choice of line direction…”feel” which way the form is moving from you. On curved, volumetric objects like a ball or a vase, let your lines curve along with them, interpreting the direction of the material, preferably also with relation to the light and how it plays upon the object. The lines need not be perfectly parallel, but at this point we’re not crossing them, in order to avoid going into more complex areas of shape and texture; those have whole other lessons. Here’s an example of what the earlier picture looked like after all the lines were put in:
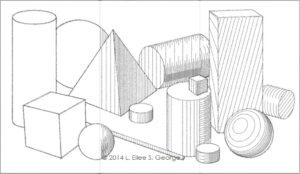
Of course, yours may look entirely different than this because you used different objects and that’s just fine. The point in these exercises is just to get the general idea of how these elements and principles work in art, and then you get a big toolbox of tricks to use in your artwork that you can combine in your own unique way to say what you want to say. You’ve just taken the first step on a journey to artistic self-discovery. Keep practicing and experimenting!
Lines – In Master Works and Cyberspace – Look These Artists Up Online!


Some well-known artists in whose work line features prominently are: Piet Mondrian, who reduced his works to the simplest components in a style known as de Stijl; Alphonse Mucha, who purposely flattened his beautiful allegorical female depictions with stark decorative outlines during the Art Nouveau period; Honore Daumier, who used a gestural-drawing approach in many of his works; Aubrey Beardsley, whose theatrical works had delicate outlines; and Vincent van Gogh, a Post-Impressionist whose works reverberated with the energy of many thick painterly lines that filled his canvases.
Be sure to check back occasionally for more lessons on the Elements and Principles of Design.
If you have any questions or need clarification concerning any of these design concepts, feel free to contact me using the Contact Form.
Be sure to put the words “Lesson Question” in the Subject line (but the quotation marks aren’t necessary). I run several sites as well as my fine arts production projects, so I will get back to you as quickly as I can. Thanks!
♥ – Eilee
Also – be sure to see the next lesson on Shape in Simple Space.
Royalty-free images of Master paintings for educational purposes provided by the old Ookaboo.com
All other content on this site © 2013-2020/present L. Eilee S. George; all rights reserved.