eilee elementaree
presents
the
MINI MODEL MENTOR
Series
Episode 1: A MODEL LOVE STORY –
I’m launching this little series for aspiring or existing model builders, dollhousers, railroaders and other hobbyists who are looking for some ideas and inspiration. Some of my posts on Twitter have gotten a lot of love with photos of my model building work, and I thought I would quench the curiosity of these fine folks with some tips, warnings, observations and discoveries.
I have almost ten years experience as a professional model builder, and prior to that I was (and still am) a dollhouse enthusiast and builder. I’ve designed some dollhouses but never built them, because as my skills improved, I kept changing them! And for a good long time I was getting the desire fed while getting paid for it, the perfect combination!
This is the first of the Mini Model Mentor series, and I’m not sure how often I’ll post episodes, but I chose something special here for the first one. I will also post on my Twitter account when I post another episode here (where it may be easier to read), so Follow!
This is the story of a model build I did solo, from receiving the architect’s specs, to delivering to the sales office.
Actually I can’t show you the draftings, because:
- I didn’t draft them, and
- I didn’t photograph them
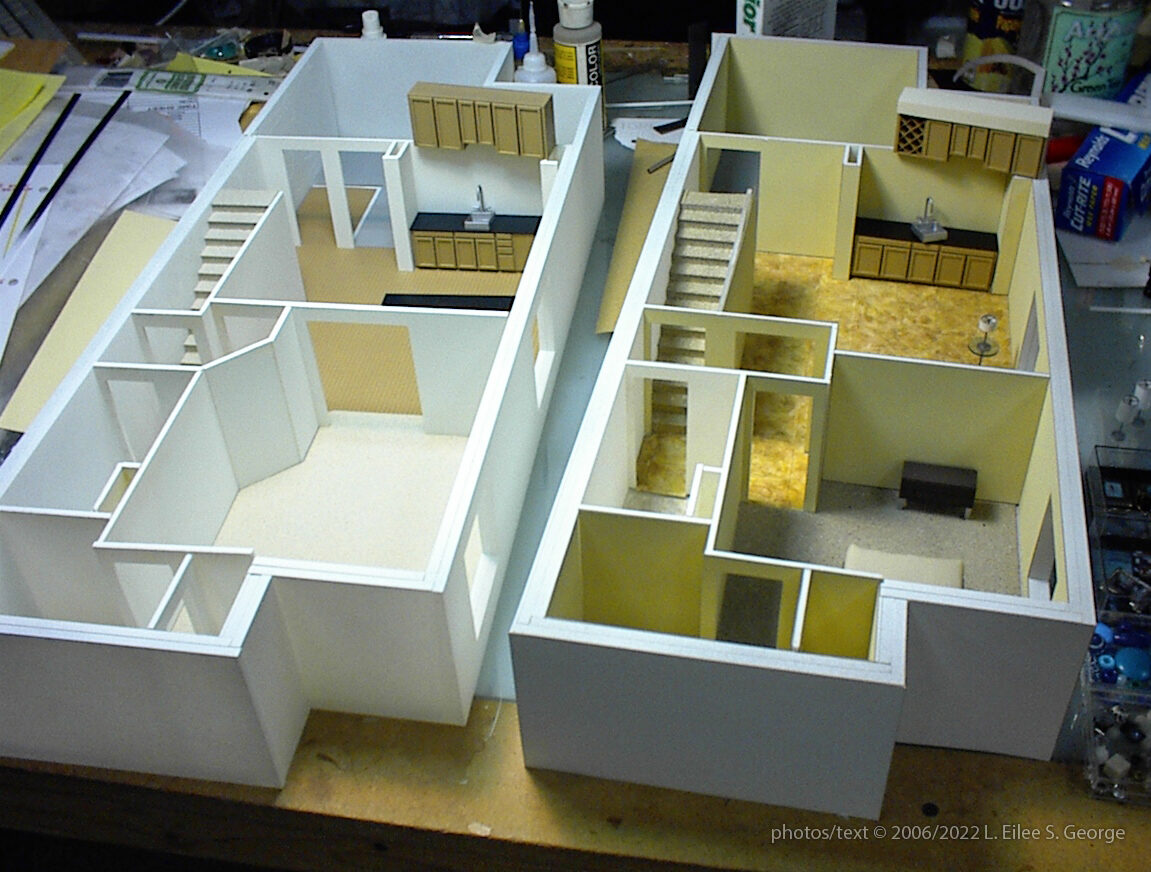
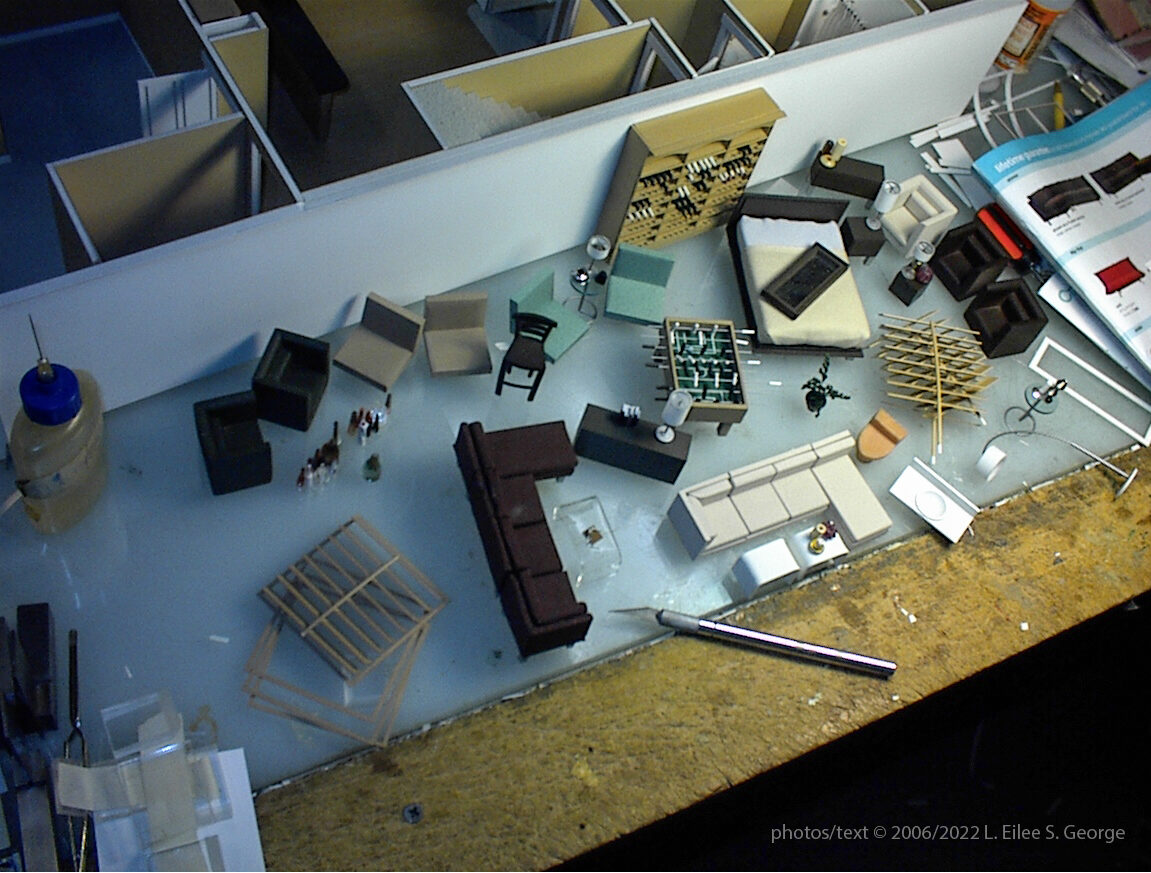
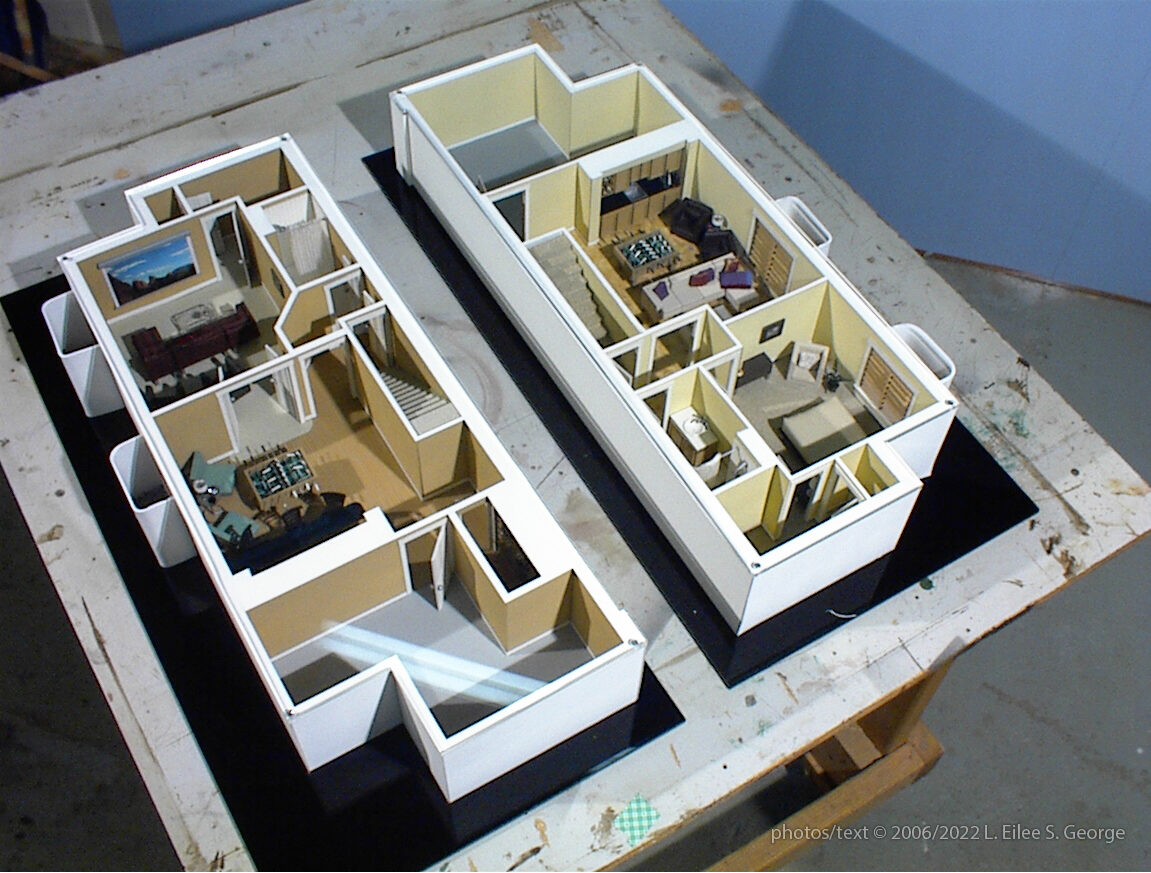
But here we are at an early-to-middle stage of the project. All walls have been re-drafted (we have to adapt from the way architects build to the way model builders build with our specific materials); they have been cut (on a laser cutter), custom paint mixed and airbrushed on, assembled and glued, and a few built-in features are being fitted and/or put in at this stage.
These models represent two possible basement options that the builder would accommodate for prospective owners, who chose options pre-build. One featured hardwood flooring, and the other, cork tile. Each had a wet bar, bathroom, storage areas, and a small hall at the bottom of the stairs. One had a small wine rack over the wet bar, and the other was to get a built-in wine shelf in the area of the large storage room.
The body of the model comprised of floor, walls, stairs, cabinets are all made with varying thicknesses of Plexiglas, or acrylic. Cardstock is cut into shapes to size for each interior wall and airbrushed before installing into the model, with enough overlap planned to prevent gaps at convex wall corners. Paint is custom-mixed from given specs provided by the architect and/or their interior design team. Seams and empty gaps will later be covered with a smoother cap and a clear top, to keep dust out of the display.
Nearly everything for the structure of the rooms is CAD drafted and cut on laser cutters. The shops I worked in used Epilogue or Universal Laser Systems laser cutters hooked up to a cooling unit to vent the smoke and exhaust and prevent fires (as many times we cut paper- or wood-based products). The software was whatever vector program of choice, mostly AutoCAD but sometimes Illustrator or even Revit.
The flooring was mostly painted onto medium-thickness cardstock. “Boards” or “tiles” were lightly scored by the laser cutter, but could have been done with a craft knife and some restraint. I use X-Acto or Olfa blades.
“Carpet” is simulated here with stone-fleck textured spray paint for this scale; it worked quite well because it is a matte finish. “Hardwood” and “cork” textures were custom painted (we worked with real samples), and then were embellished, to make more realistic variations. More detail on this later.
Accurate, appropriate scale of every detail is of utmost importance.
Next pic (I’ll do pictures and then talk about them):
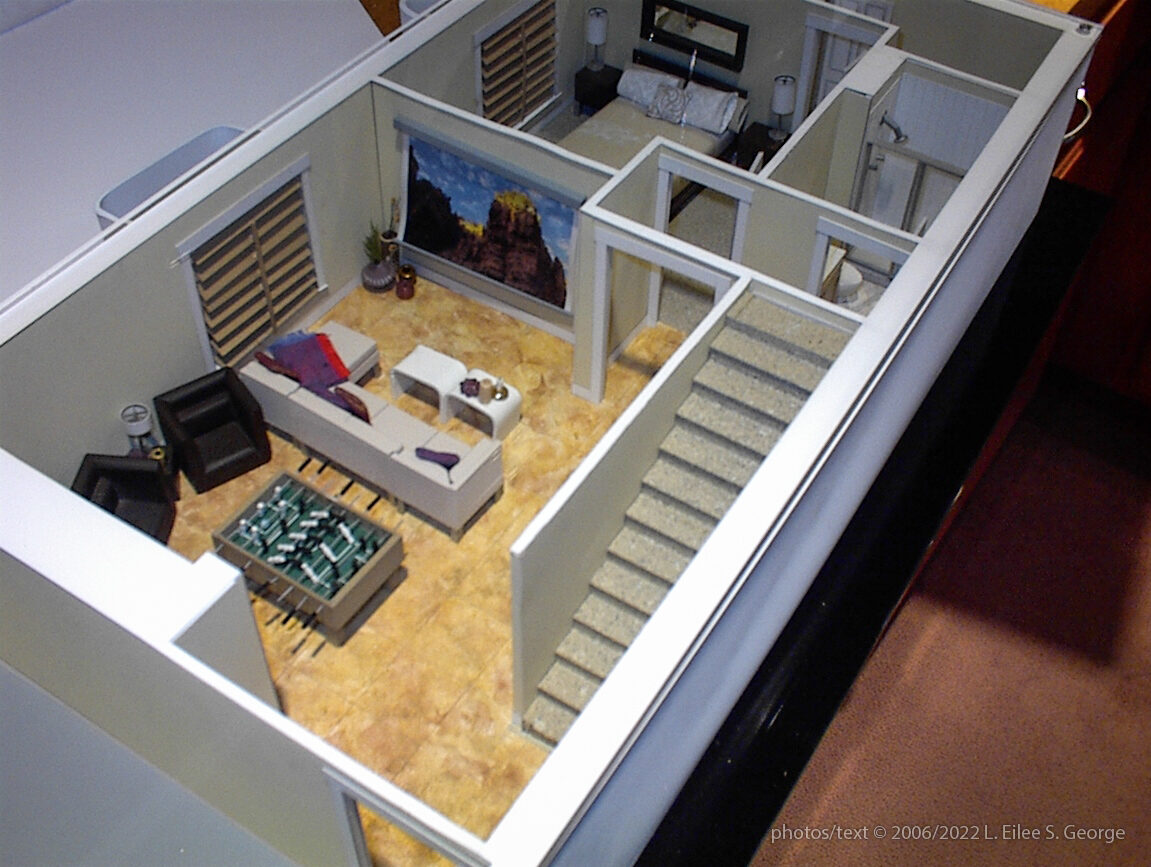
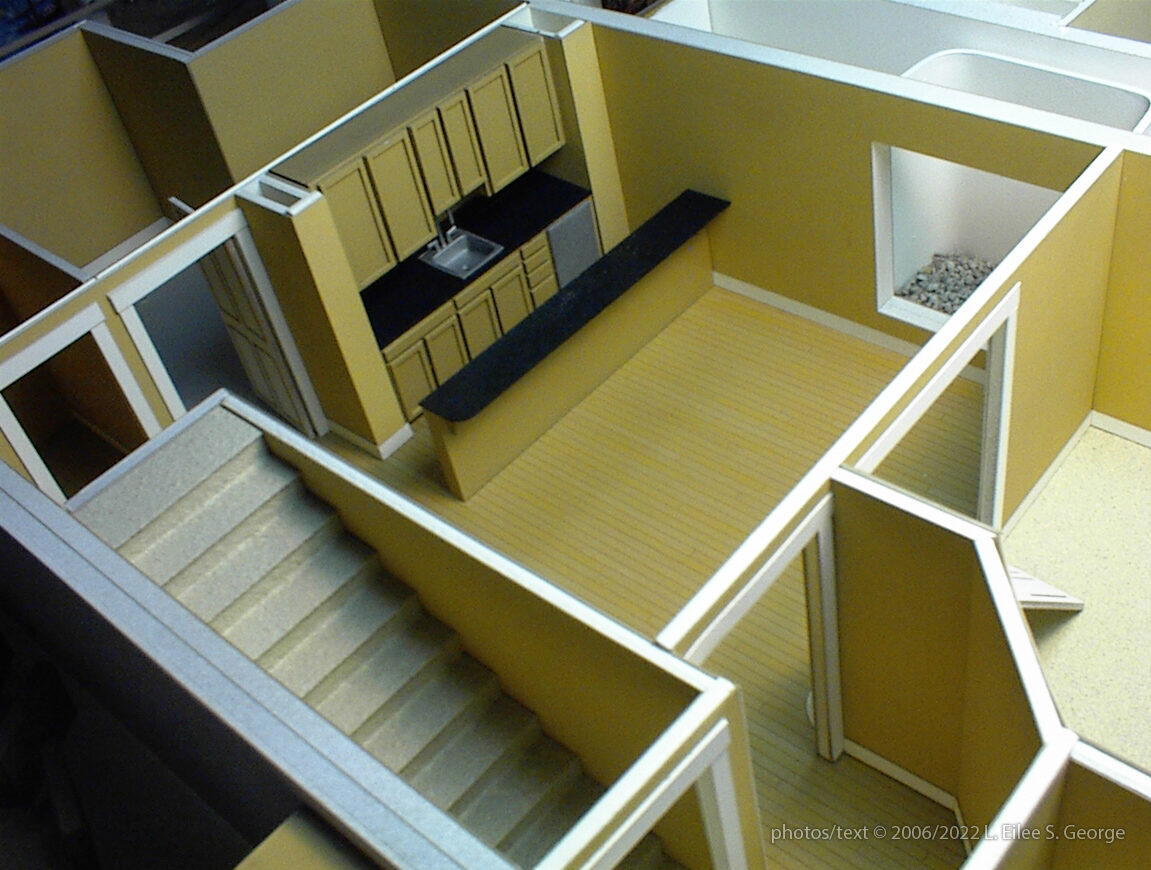 Above is a little better shot of the wood floor; unfortunately, all detail in the countertop is lost, as all I had at my disposal then was an early 1-megapixel point-and-shoot camera with no macro-lens capacity. The countertops were painted gloss black as a base, with metallic copper or teal, and pearl gray as an extremely light overspray: just a few flecks here and there. This was followed by several very thin coats of clear gloss, to simulate granite.
The window wells needed gravel; we had many scales of “rocks” in stock in the shop, but in a pinch, you can find fine gravel outside (I highly recommend washing it out!)–or even fresh (never used) kitty litter clay bits. Since exterior walls were two thicknesses of ¼” acrylic thick, I had to make a sill and lining all around the window interior to visually clean it up.
The well itself was either sheet Styrene or Sintra (this was a few years ago), heated and bent into the desired shape. This should always be done in a very well-ventilated area; most plastics emit toxic fumes, and anything with any vinyl content should NEVER go in a laser cutter, due to noxious gases and low melting point of these plastics that will spoil the shape of it anyhow. All Styrene and Sintra we cut by hand either with craft knives or on the bandsaw. Of course, a floor needed to be traced first and fit into the bottom of the window well, in order to hold the gravel. Later a window itself and blinds were made to fit into the opening.
The large storage room area was to be a concrete floor, and standard gray primer was perfect for an interior concrete floor look.
Styrene strips were used for all of the baseboards, door facings, other trim, and many furniture elements and details that you’ll see later on.
You can see I’m fitting a couple paneled doors at this point. They are layered Plex too. Panels can be carefully beveled at the disk or belt sander, preferably held by needle-nose pliers because we like our knuckles. Next.
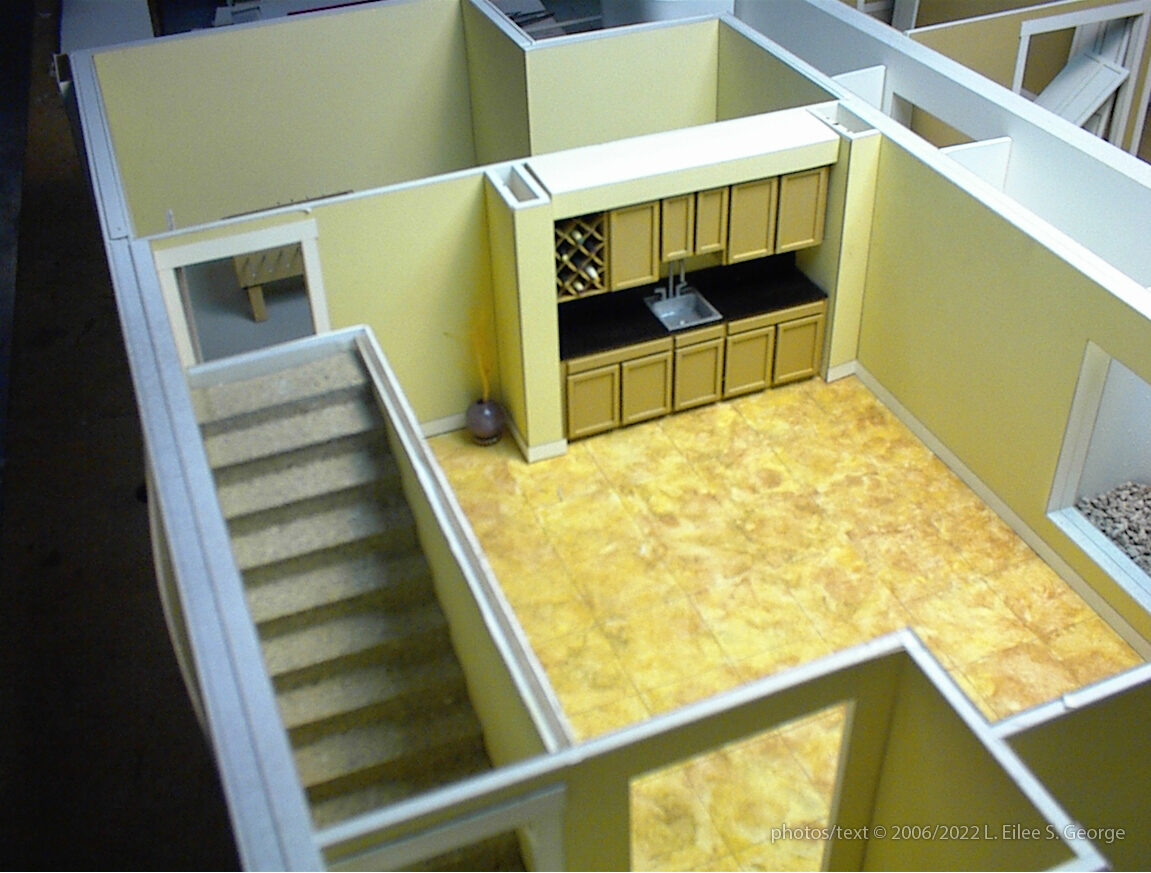
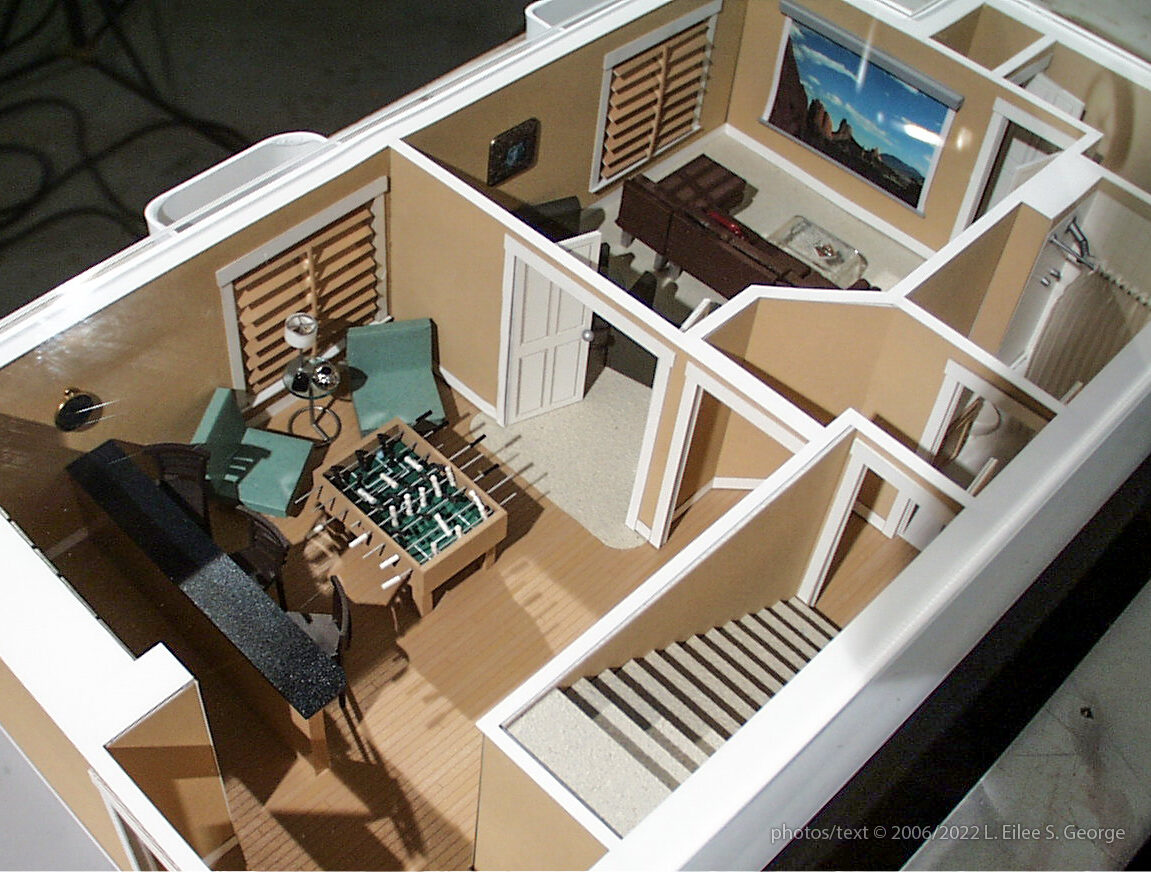
This ^ is the other model with the cork tile flooring. It’s all one sheet. You can do individual tiles if you want to, but deadlines count! And much of the time, folks won’t notice the extra work you went to. This is cut to the shape of the room, to fit under the baseboard (before installing it), and scored to show the “tiles”. Then it’s primed with spray primer, then airbrushed with a custom mixture of the perceived main base color. Last it’s dry-brushed with a small brush with a few diluted hues of watercolor to simulate the sample supplied by the architect’s interior design team.
The cabinets were made of Plex/acrylic and the doors are just two layers; the outside one being more of a frame. They’re airbrushed a flat color.
The wine rack was fun. I made it much the way the separators are assembled for liquor boxes, just cut out of acrylic with a bandsaw. Yes, that’s right. I can’t emphasize how much pliers help in these tiny operations….
The sink was sourced from a tray/insert from an old eye shadow compact. Another sink was created with a cutout of a product package; you know: the sort of vacuum-formed blister packaging types of plastics you usually throw away. If you get heavily into modeling, you’ll look at such things differently. I found one the right shape and size, drilled a hole for a “drain” and painted it like white enamel. I can’t tell you how much found trash helps with weird shapes! It is especially helpful when working with a low budget yet high imagination and synthesizing cognitive skills.
You’ll notice the urn in the shadow of the corner; it’s just a couple of beads, with the tip of a weed from outside stuck into it. Your brain completes the illusion because of the scale and context it’s surrounded by. I’ve done the same thing with bullet casings picked up from a shooting range: depending on caliber, they can stand in for wastebaskets, vases, or those retro metal tumblers from kitchens of the 60’s. “Next slide.”
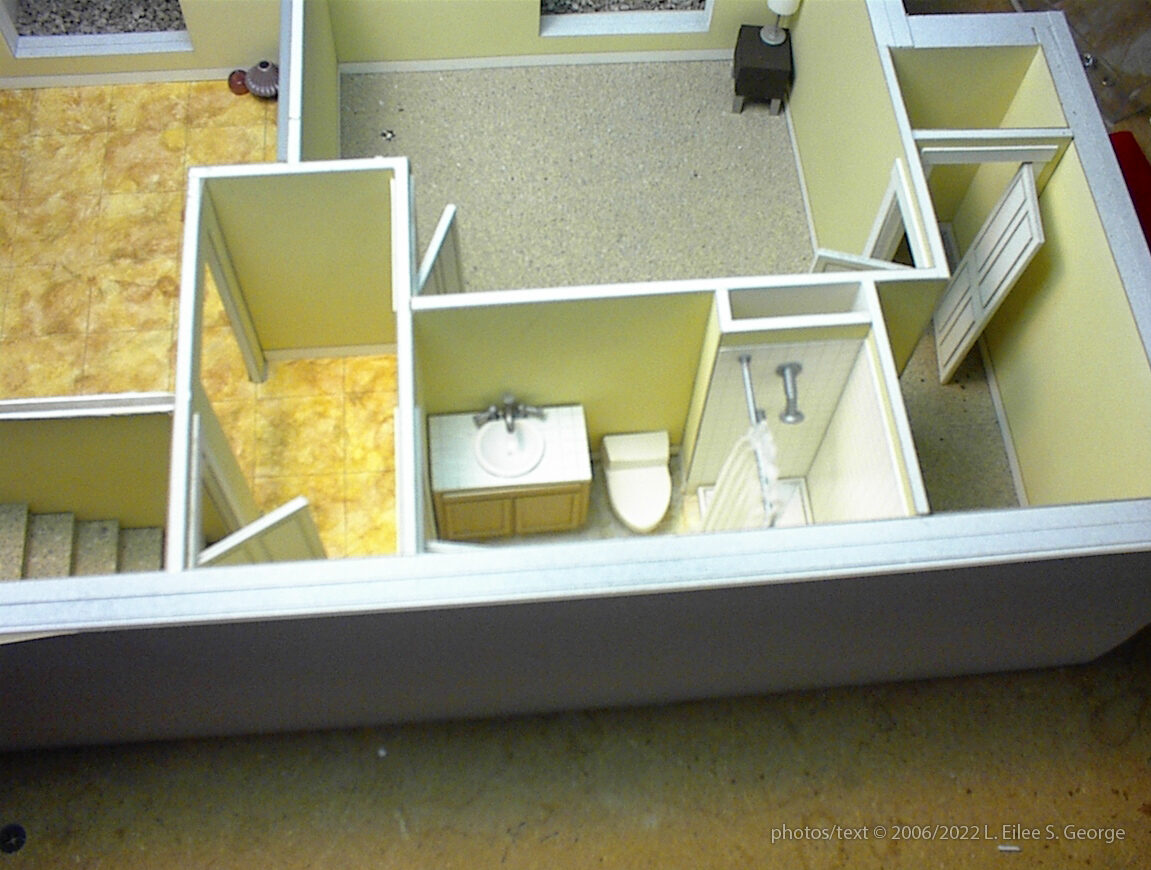
Here we see the bathroom–each is identical between the two models. You can see the sink bowl itself that I sourced from a packaging insert, and painted after drilling a wee hole for the drain (you can get the tiniest of drill bits with a special small eggbeater-style manual drill for such needs; I recommend a small vice as well).
Fixtures and furniture are not mass-produced at all of the scales in which we find ourselves building models (that is largely decided by clients, as they have to fit these things in certain spaces). So most times, you’re on your own to create everything from scratch, or repurposing what you can find, to simulate parts.
That’s definitely the case with the toilet, which I had to sculpt freehand from either Fimo or Sculpey, I don’t remcall which.
The faucets and shower rods were particular challenges. I procured different diameters of Styrene rod, and had a small propane torch at my disposal. You can start up these little torches that are attached to their own tanks, have it going in a safe spot (a tempered work-worn THICK glass tabletop like on a light table is divine), and work the shapes bit by bit. PLEASE have a fire extinguisher AT HAND. I would VERY briefly hold a longer-than-I-needed length of Styrene over the flame *while twirling it* so that it heated as evenly as possible, to heat it only just enough that it would bend, stretch, or in some cases, press the end perpendicular onto the glass surface to “pool” it, to make a “flange” shape flaring out at the end. Most of these operations you don’t do in one go, nor do you get it right without a little practice as you get used to the material. Again, have lots of ventilation blowing fumes away from your face (or anyone else’s). It gets hot so a variety of tweezers and forceps are handy! This was a lot of trial and error. And it’s how I managed to create tapers, flares, and curves in things so they look just like metal once I finished, cut them to length and painted them! I did the same thing to make bottles with clear or color-clear acrylic rods of various diameters.
The shower curtain is also an interesting puzzle to solve. None of the fabrics I had on hand were thin/shapable enough (there are fine silks but they’re very delicate). We only needed white for the color, so I actually used one separated layer from a single facial tissue, accordion-folded it, and used a small hole punch to go through all those layers on one end after folding it. Then I threaded it onto one of those rods I was working on for the shower curtain rod; it was only shaped and painted on one half. I scooched the curtain over and taped a baggie over it to protect it from overspray, and melted/flared the opposite end to the width of the shower stall, painted it, removed the baggie and had a completed assembly. The tissue held the folds quite well; it may not form the most natural drapery (it’s almost impossible at this scale; fabric is a weak link), but luckily, neither do plastic shower curtains! We went back and forth between these and shower doors a couple times.
The tiled sink counter and shower walls were scored acrylic, same technique as with the floors. I think the bathroom floor was scored for tile as well, but my photos don’t quite capture it.
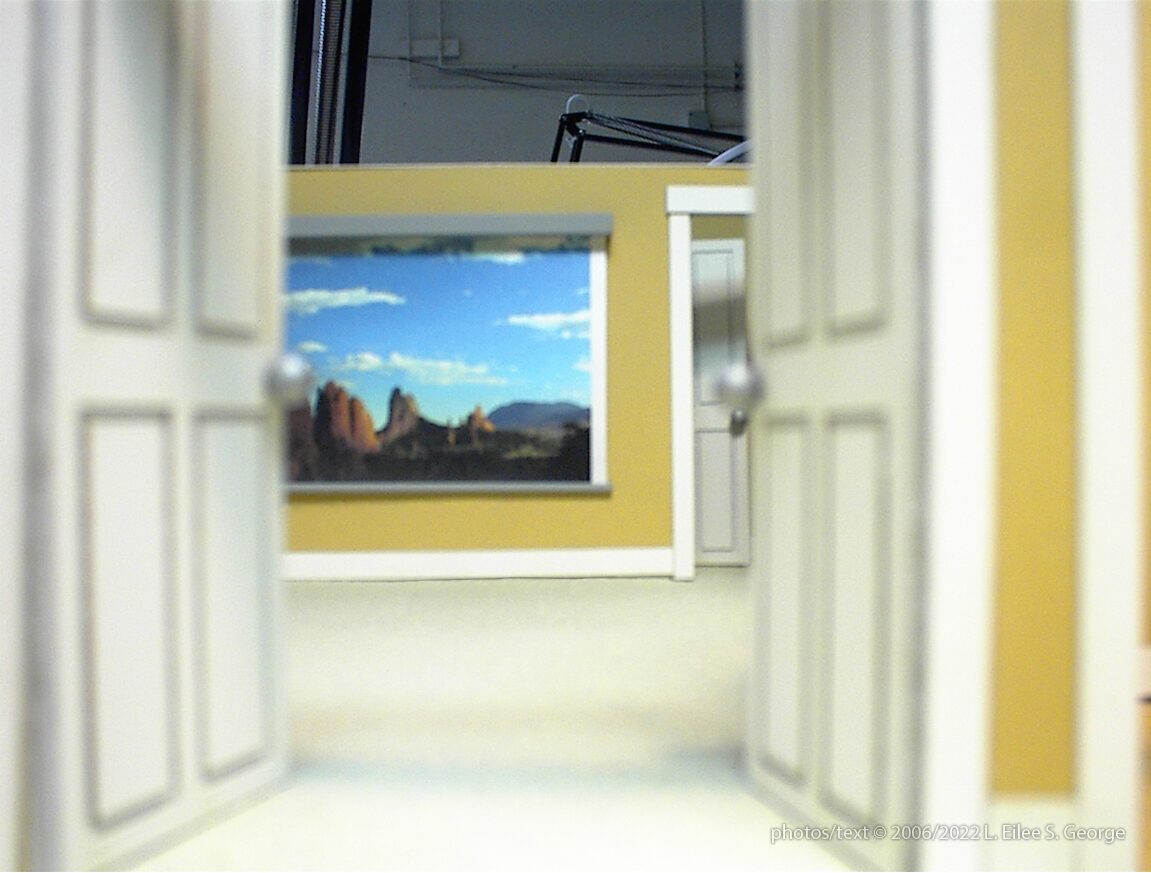
Up there’s a fun view: I just set my camera right into the model, and the lens is about at a (to-scale) child’s-eye-view through a doorway.
Through the opening you can see a “projection TV” screen, that’s just a couple of lengths of Styrene (one square tube, and a smaller half-round at bottom) flanking the “screen”, on which is printed an image from one of my photos.
Throughout the place, any image used in art, I used reduced prints of my own drawings, paintings and photos, so nobody else’s copyrights were infringed in this commercial project, and I knew my work was in no danger from such tiny images, and easily could give my limited permission, being in charge of the project and all.
I tell you, those doorknobs in the foreground that you can barely discern were THE WORST. They’re trimmed push-pins. I had tried to laser-cut holes for them, but the holes were too small and too shallow. After gluing it up and discovering this issue, because I’d been too lazy to actually measure the pin diameter with our calipurs, it was VERY hard to hand-drill with those tiny drill bits into that Plex/super glue combo. Yes, laser-cutting actually melts out a hair larger than what you drafted, but I was that far off. Next time, make it just a bit bigger, because the thin-viscosity super glues we used do wick into cracks pretty well. Those things are in there SOLID.
Also, remember to measure your doors to be a little shorter than the openings, to clear the flooring thickness. This I did remember to do. You can get hinges, but that’s if you’re going for that extra-realistic layer of detail that includes outlets and switches; we weren’t. And buying those things ups your budget a shocking amount.
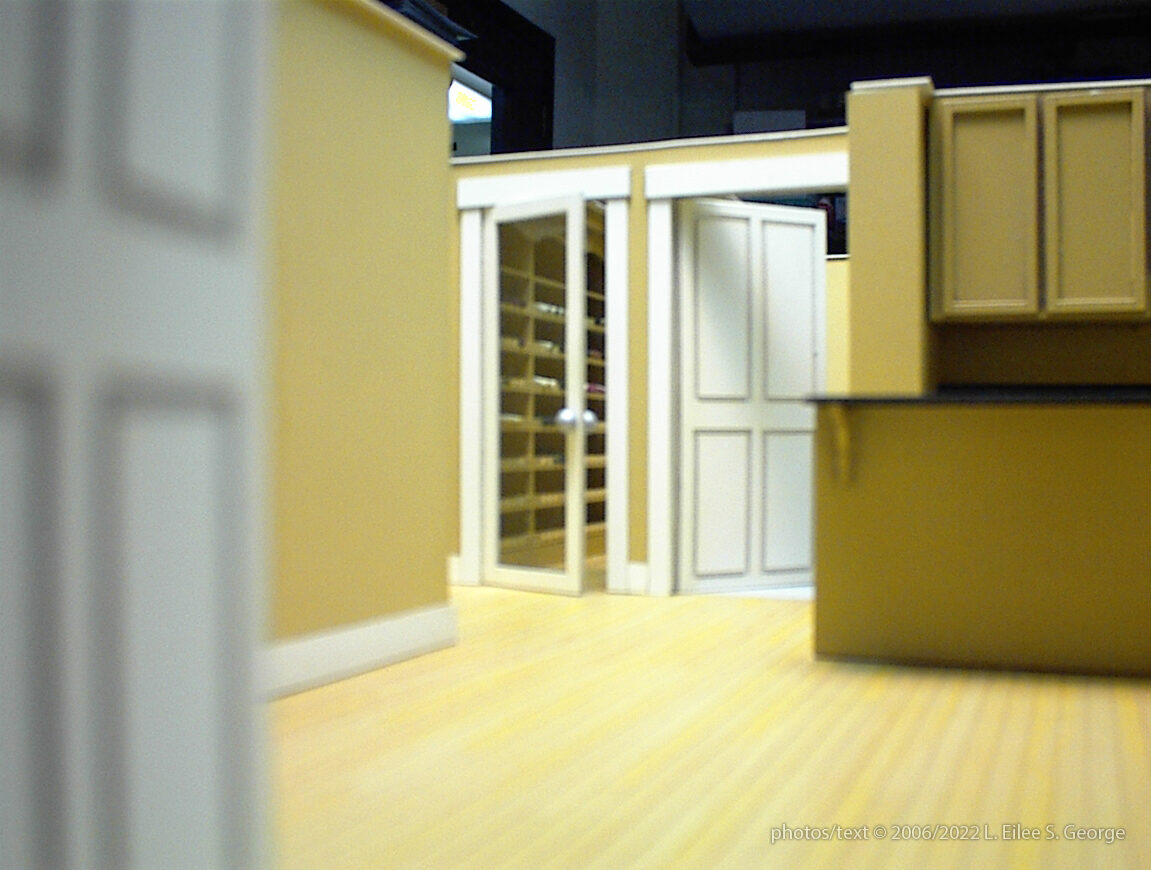
Above we see another denizen’s-eye-view, with the camera in the model. I had no idea what it would capture! Here you can see the built-in wine shelves through the “glass” door.
You can also just tell that there’s a small corbel holding up the cantilevered countertop on the peninsula for the wet bar in this model (the other had no peninsula).
This is also a better view to notice that there is some penciled variation on the “hardwood” flooring. (What I would give now to have had a macro lens then). Oh I wish you could see the detail!
It’s also easier to see layers on the doors, and the cabinet doors at this angle. I even hand-filed a bevel into the interior of the cabinet door frame layers on the front.
The cabinet doors do not open in these models, so they’re not hinged, but rest assured I could have done it, and know the sources for that small of door hardware as well. I do not make my own hardware outside of some doorknobs; the rest is far too intricate. Most of the commercially-available ones are made of brass and are impressively accurately scaled to the last detail. You can spray-paint it whatever color you want, but know that priming and painting throws off the scale, and gums up the works, and the nature of paint is fickle: once dried, it will crack and flake off with too much part movement. You can try your hand at anodizing or oxidizing or otherwise chemically changing their appearance, but I’m NOT your instructor for something like that; do research and follow ALL safety recommendations.
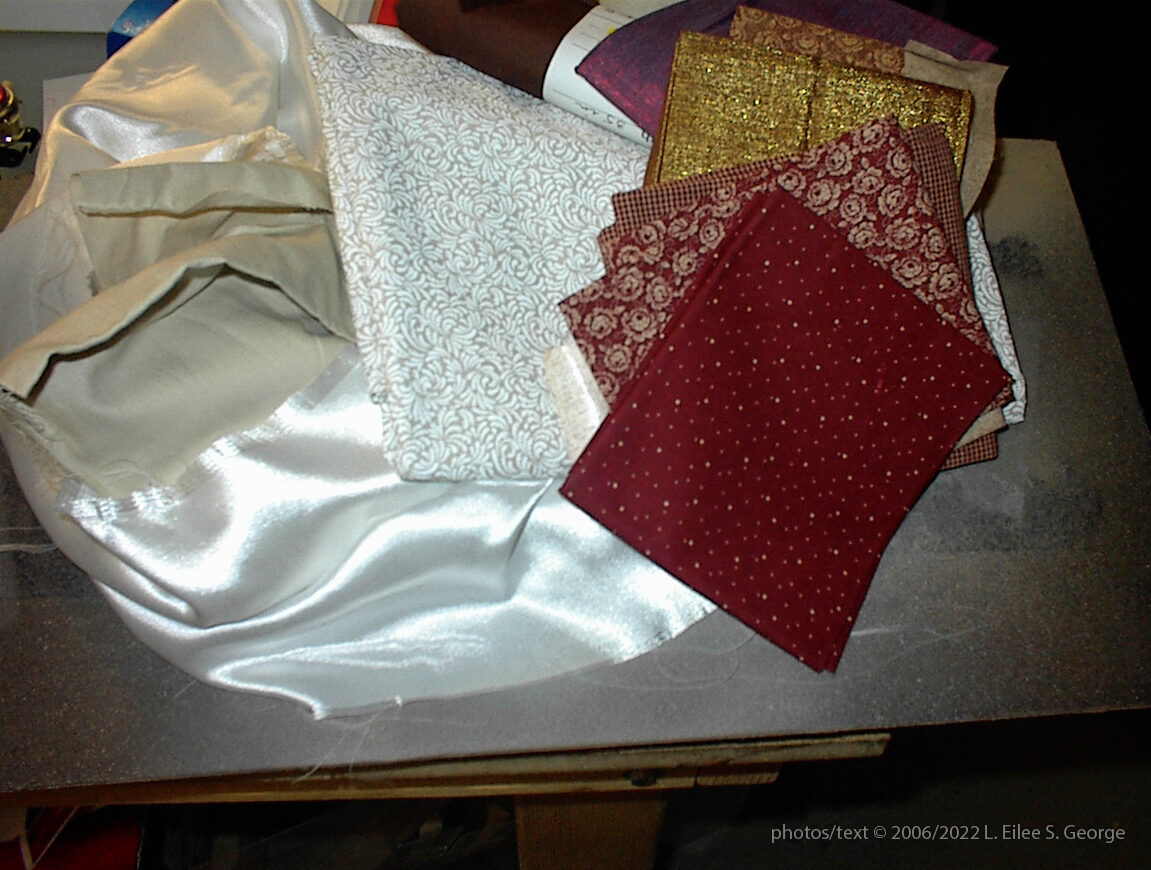
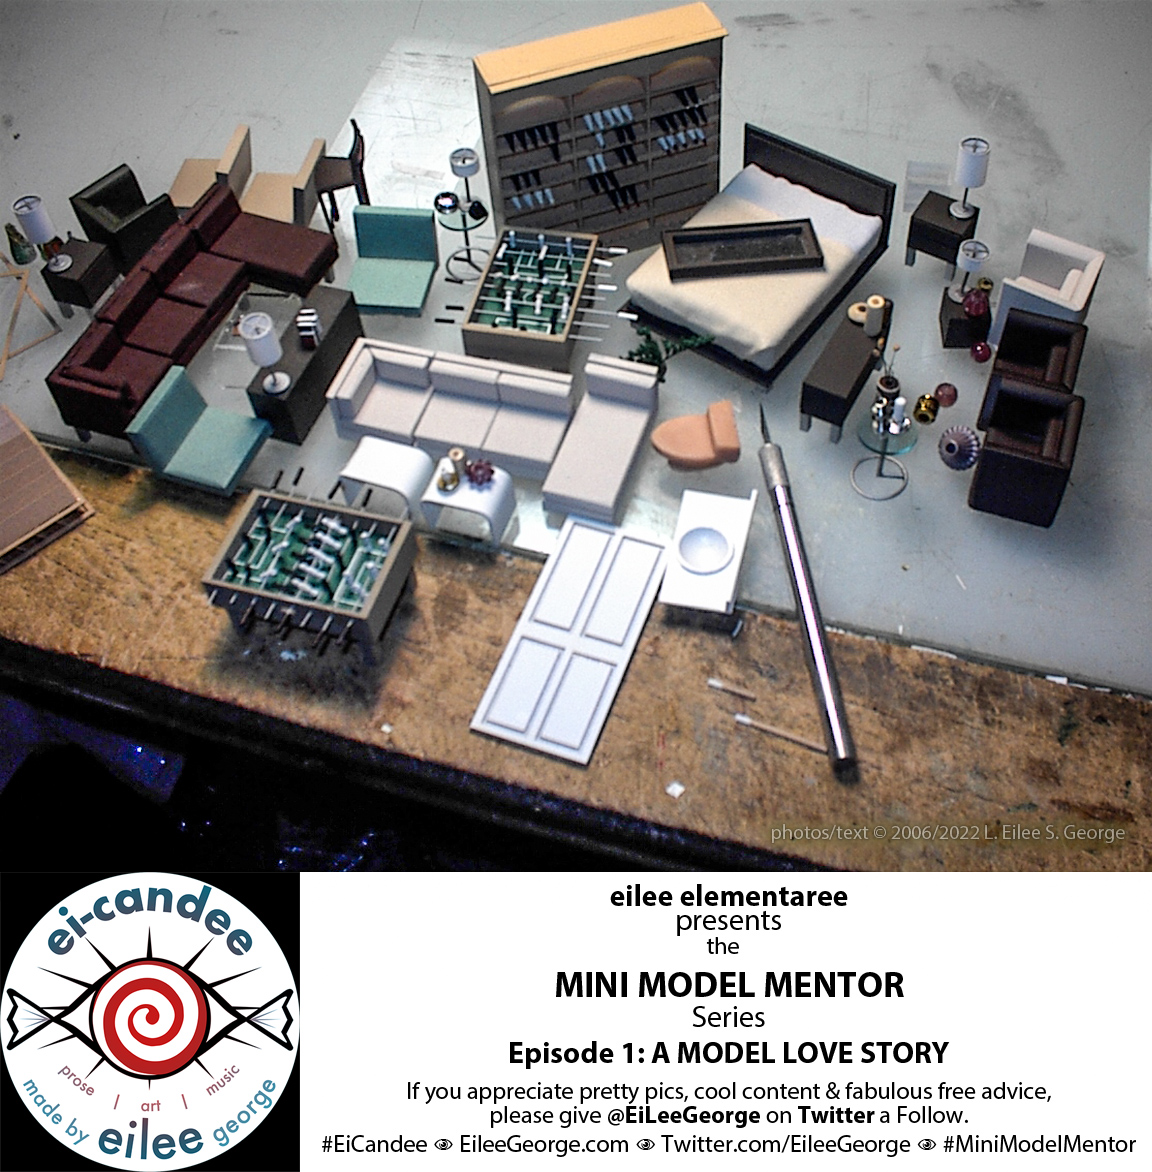
What’s all this? Fabric??? Precious few models go to the extreme of interior decoration, (but it’s a dollhouser’s dream). I was the perfect team member to put on this project because of my dollhousing background.
When doing furniture it’s nice (and helps to fool the eye beyond these few details) to put actual fabric on SOME of the “upholstered” pieces. I find that the “fat quarters” in the quilting section of any fabric store are a FANTASTIC source of color-coordinated, small-scale prints that will really make a room look nice. Remember that you need some solids, too, and those can be done with just plain paint, sprayed on finely in several coats with an airbrush if possible, to make it look soft.
Regarding furniture and pillows that use fabric, think like an interior decorator: you do NOT put the tiniest, most tedious patterns on the largest pieces of furniture, nor do you put the “large” prints on something so tiny that the pattern doesn’t even repeat before going off the piece. Don’t mix so many patterns that it’s too busy. Give the eye some rest. Use a lot of neutrals and use your primary and secondary “accent” colors sparingly, or at least with marginal taste and restraint (yes, I worked in interior design before too). That may sound too conservative and traditional, but remember that working in this tiny scale it is VERY EASY for it to look cluttered, and it’s not a good look for sales.
When wrapping fabric around a base shape to glue it (like a cushion or main body of a sofa), to glue it, you can cut a notch out of the corners (not too far!) to make it lay flatter. Bunching fabric throws the scale off faster than anything and ruins the illusion. If you sew, use the shortest stitch length on your machine, or do it by hand, with fine thread. Watch fabric glue; it may stain and stiffen–test first.
^As you can see here, I chose to go quite modern with the furniture and keep it simple. Geometric forms are great–and fast! I used some sort of catalog for ideas of styles for sofa sectionals and chairs, as well as the barstools and bedroom furniture. Look for styles that are so common that nobody can say it’s a direct copy of someone else’s work–or make little changes of your own to personalize. I stuck largely with solid colors for speed of production and visual simplicity. Modern is wonderful! Each piece that I used for the sofas, I rounded the corners and edges (carefully on the disk sander platform, holding them with needl-nose pliers to keep my busy fingers working. Acrylic (Plexiglas) is nice and hard, so you needn’t worry about the plier grip teeth making much of a dent; if instead you’re using wood for “cushions”, use some rubber shelf paper trimmings between the pliers and the wood; it not only minimizes dents, but also helps to grip the wood. Please do NOT use Balsa or basswood; it’s SO soft and spongey it nearly self-destructs. Trim sections that you find at the hardware store have furring strips and other trim that you can even use as extrusions to cut things mass-production style.
Various colors, thicknesses and shapes of sheet/extrusion Plex and Styrene were used for many items. Lampshades were Styrene tubing cut to length (or “height”); the bulb clip/spider/top ring of lampshades were CAD drafted/cut out of 1/32” Plex on the laser (this is so thin I had to draft and cut a few times for it not to melt out of existence; sometimes cutting half-way through a couple times instead of one go will help prevent such melting; just don’t move it between). I don’t know but if you have one of those Cricut things (I never used one), you might be able to cut one out on there; no idea but experiment if that’s what you have!Drum/cylinder lamps are super mod, and easy to make. Lamp bases were more Styrene shapes glued together, then to the shade assembly.
Paint all your parts before assembly!
The blinds were awful; I’ll never do those again like that. They had to balance perfectly in the middle and glue did not cooperate long enough to keep them straight. How I cussed those things.
Bottles were fun. I melted clear acrylic rod in several places along its length and stretched it in a very controlled way wherever I melted it (stood holding the rod over the torch twirling it, again so that it would melt evenly around and stretch evenly, and standing with my arms outstretched to do that instead of sitting gave me the control necessary to stretch it and keep every part of it straight. Sitting simply limits your range of motion in some operations, same as with drawing; moving larger body parts in an arc makes a prettier arc than concentrating with your hands and fingers.) Once I had my acrylic rod melted in a fat/thin/fat/thin pattern, I could cut in the middle of each fat and thin area to make individual bottles.
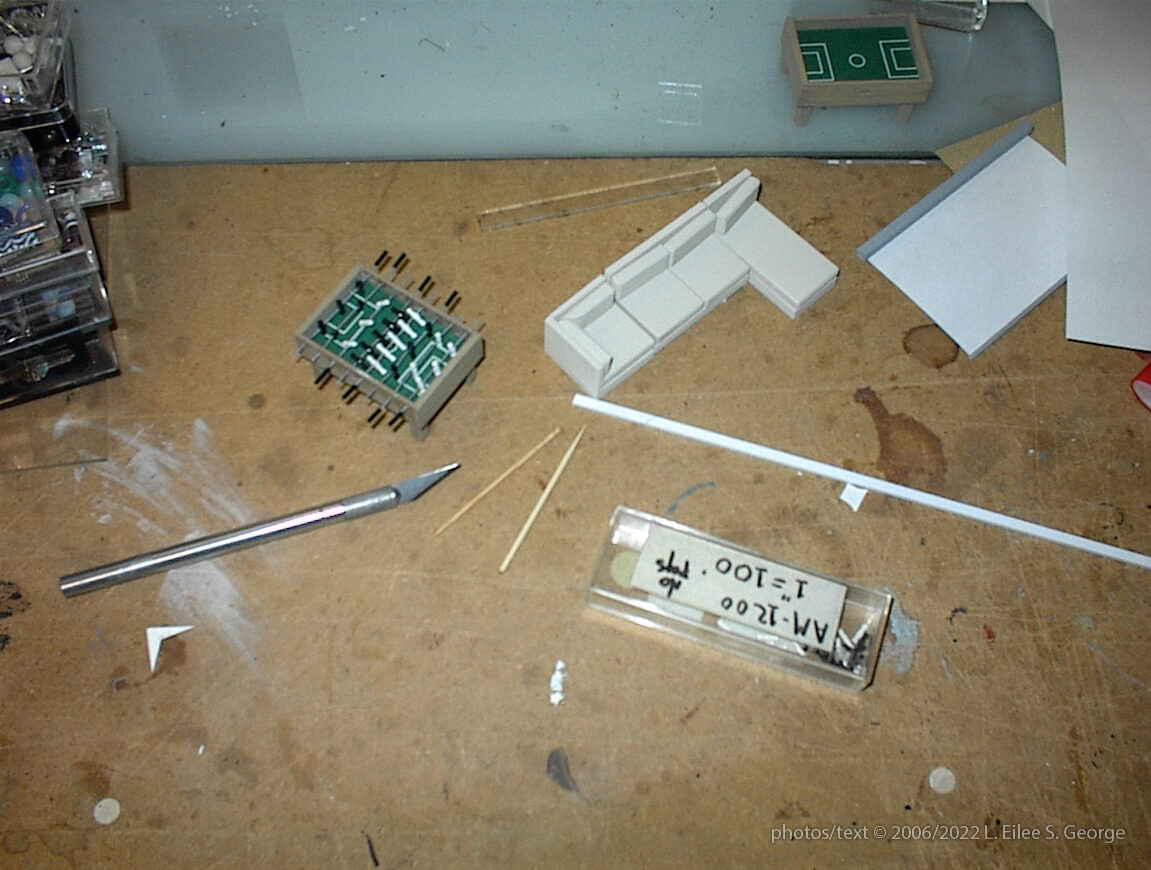
Ah…the foosball table, my piece de resistance. Double-decker cabinet assembly with cleated legs, actually spinning bars with players.
This was a personal challenge to me; I can’t tell you why–I am the worst at playing foosball! This is my win I guess.
The client wanted some element of a game room in each of the two models, and gave me full artistic license (since I certainly know what I’m doing). I made one of these for each model (and a third for myself!) Once my husband and I move, unpack, and I find it, I’ll take a better photo of it and post it someday.
The rods, or axis on which the “soccer players” spin, are made of very thin Styrene rod. The handles are the same stuff, just thicker, a simple butt joint glue-up. I made a mistake and spray-painted them all black at first; you’ll see I corrected that in other photos–since it was already assembled by that time, I had to paint them by hand with white enamel puddled in a cap, and a fine brush that probably had less than 10 short hairs on it. Three layers (at least)!
The ”field” for the “players” on the table was simply printed out to scale and covered with thin acrylic for shine. Don’t forget the hole for the ball, and the hidden ramp inside for its exit.
Do you see the toothpicks on the worktable? One is standard, the end cut off, and the other is a lathed “fancy” toothpick for cocktails that you can buy at any supermarket. When I looked at that, I saw the little soccer players I needed! Now…I could have just glued it up: rod/man/rod/man, like –|–|– but there’s no way that it would ever have been straight. I made the judgment call to use tiny drill bits again, and drill through every single one of those little “players” manually, while the toothpick (still whole) was clamped in a wee modeler’s vice. I had many fails–it took lots of patience. Successfully drilled parts were then cut off the end of the pick, painted (double-stick tape on scrap Plex is handy for this), threaded on “rods” as rods were threaded into the finished cabinet holes, and handles were glued to the ends. Whew!!
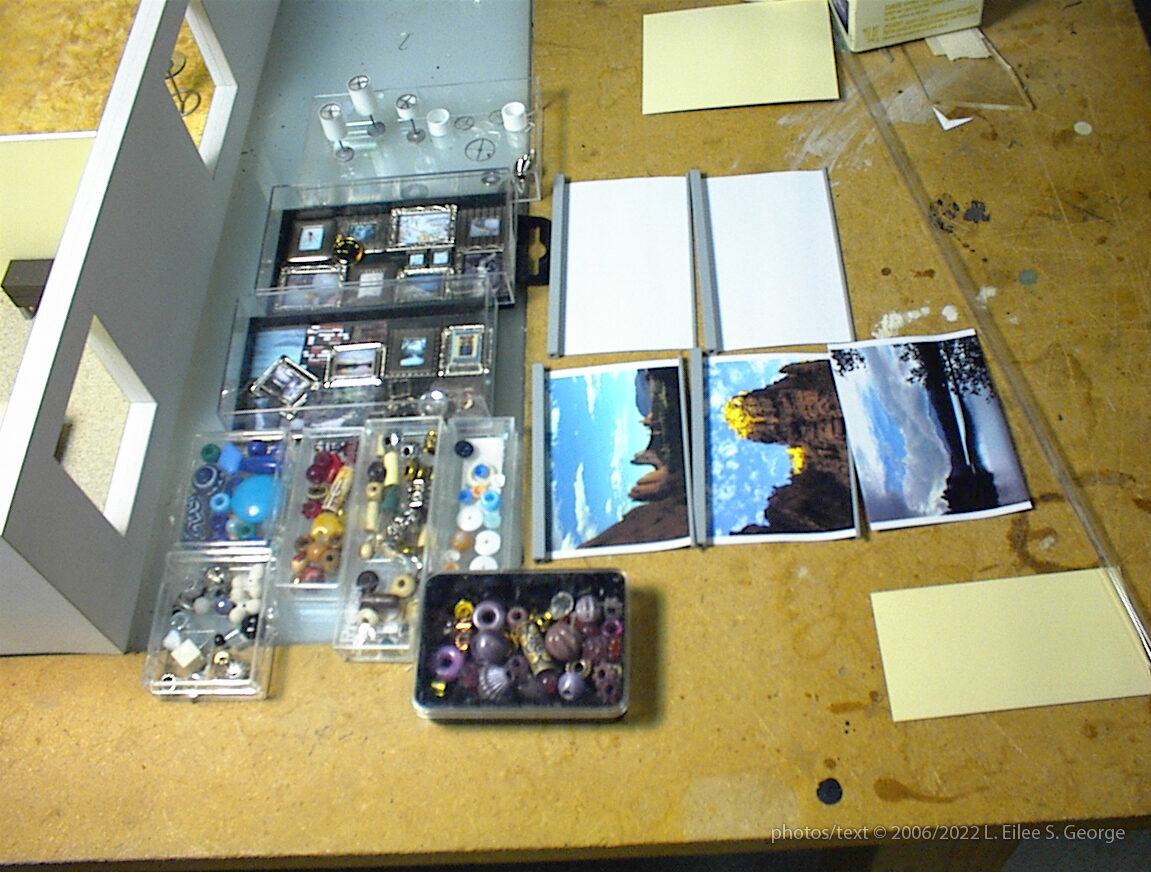
What makes a house a home? Well…family, but the next best thing is all the tchotchke people put in it; it’s not just furniture and fixtures!
Here you can see the lamps in the background, but also BEADS are priceless for everything from vases to cannisters to dishes of all shapes and sizes to urns to lamp bases to objets d’art. Stack a few pretty little ones for perfume bottles on a vanity. String some wee pearls for a necklace next to them.
You will also see some of the “artwork”–complete with frames procured from the scrapbooking section of one of the hobby stores I frequented. All of the art again is reduce prints of my own art; you can do your own photos with your printer. Some folks take shortcuts with images cut out from decorating catalogs, but I do not like flirting with copyright infringement, even with images from ads.
You’ll also notice I’m using a LOT of tiny little clear boxes, in which I organized these many tiny parts. I can’t emphasize enough how very important sturdy storage and organization is in miniature making. Keep “like” things together, label containers; when inventory depletes in any supply, write it on the list to replenish right away!
Also, if you can, notice that the work table that these are all on, is a sturdy particle board with a glass insert–this is a light table. This is vital in model making, even if you’re not testing a model that’s going to be lit: it quickly reveals where any gaps are that you need to patch, fill or redo. Most of my shops’ projects had an accuracy tolerance, one down to 1 or 2/1000 of an inch. Any flaws show up BIG in little things!

And here we are, almost finished.^ I did use cloth on the bed and for the throw pillows, and I combined a cloth pillow as an accent on the side chair in the same room. Cloth pillows also embellish the sofa (we were scolded as interior decorators not to call them “couches”, and “it’s not ‘purple’; it’s ‘violet’” and “they’re not ‘customers’; they’re ‘clients’!” And there’s a coordinating purple throw and vases on the chaise and coffee tables respectively–positively SWANKY.
The doors are all hung and the blinds are in (you can see I still struggle with the blinds on the left) and the windows have their trim now.
The top cap that covers up seams and structural gaps, like the one behind the shower nozzle, is on top, making it present much cleaner.
Holes have been drilled on the corners, through which I attached the clear Plex viewing pane, which protects a model from dust, dangerous hands and spillage, and basic devastating destruction. The top is screwed, not glued, because I just may be called on to make changes/repairs, and don’t want to damage it to get in.
Remember these models are not built for playing! It’s a huge liability and they are not for kids. These items are not constructed in a way to survive handling; they’re never meant to be touched (or left in the sun). There are entirely different specs and actual laws for designing toys, and we are not in that sector. Small parts, as everyone knows, are dangerous to small children, and children can break even the sturdiest of toys. Being that models like these are often at least four or five digits in cost, you don’t want to confuse the two. They are strictly sales tools or professional display only.
Styles come and go, and these two models will remain a timestamp of 2006, like a time capsule. It’s one of my favorite projects ever, out of almost a hundred models, and I’m very sentimental about it. It cost the client many thousands of dollars but I didn’t care, so still, I affixed a label to the bottom of them, announcing: “Lovingly handcrafted by” (me), with my contact info, because I was very interested in buying them back, once their units were all sold and these sales tools were no longer needed…. Alas, apparently someone else valued them too.
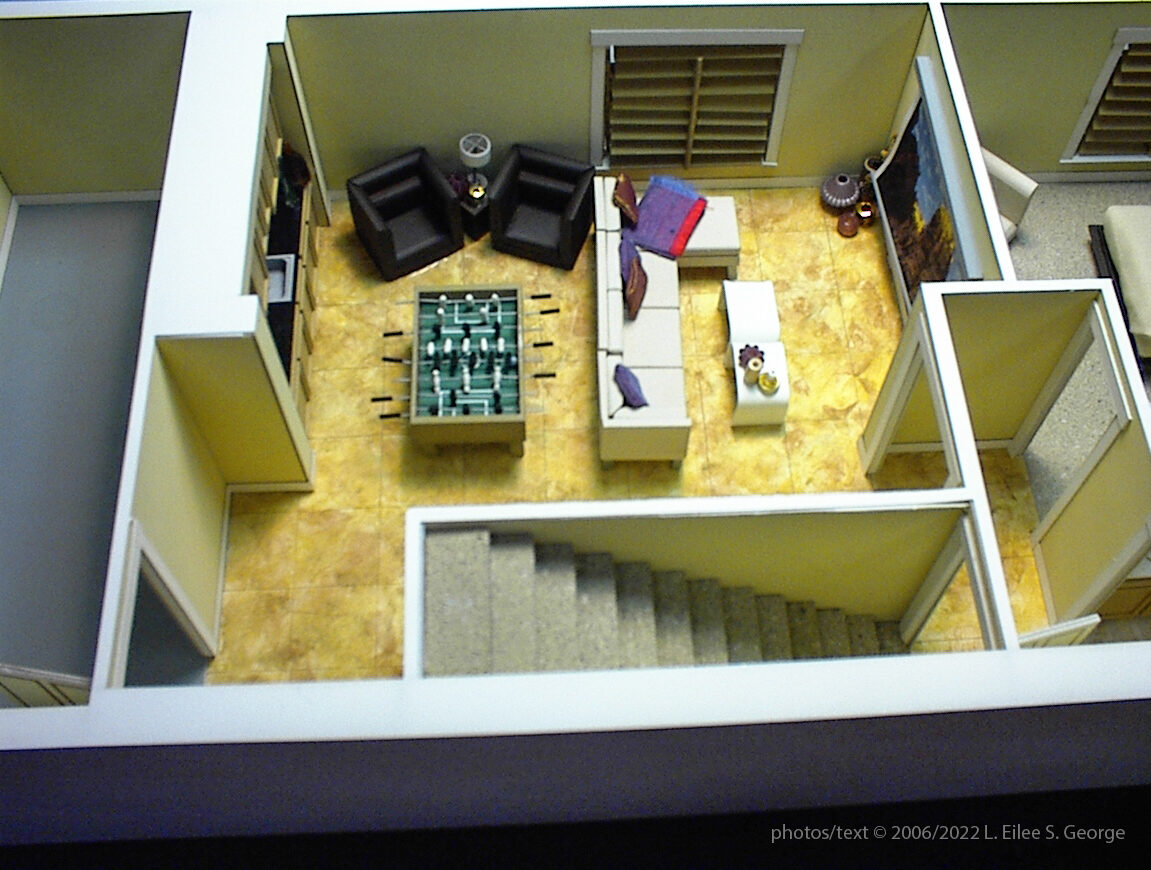
And here’s just the next room over, in that same model. Even today, with these low-quality photos, I can nitpick the heck out of it, and observe half a dozen things I’d fix: the cursed uneven blinds (you have no idea how many times I redid them), the slightly curled-up screen, the wall corner I should have touched up the paint on the edge of…but that cork floor is perfection. That was one of the hardest faux scaled textures for me. And I was THE go-to person to match colors and patterns; I have an uncanny ability with that, stemming from my drawing and painting background. Mom used to take me to stores to match items back home in her closet–I have perfect color memory.
And that’s the thing: everything you do is informed by everything you’ve done. You see in this and many of my model projects, I used my pre-existing skills in drawing, drafting, painting, sculpting, dollhouse building, beading, general industrial design (I have a degree in it) including woodworking and welding, and plain childlike ideation (I will never grow up)…this was the perfect profession for me…and I do indeed miss it. Perhaps I should give it another go…the economy will always boom and bust, again and again…maybe just keep starting over. I do love it…as only an obsessive compulsive can!
Of course you can see much of my fine art on this site, including Drawings and Paintings. or browse them or my photography or digital work through their parent Galleries page. You can see my more recent fine-art photos on my Twitter feed (of course I shot all these in this article more as a documentary style). You can also see some of my other more industrial design related works in my portfolio on SmARTfulSolutionsByGeorge.com – the site for my LLC.
Important note: PLEASE source as many materials you can from your area mom-&-poop’s, not chains and online sources. These neighbors are on the endangered species list from lack of local support; we’ve lost some epic hobby stores in recent years. Model railroader places are great sources for the architect set. These little one-off stores are almost always full of great people with super-helpful advice, and that’s worth a LOT!
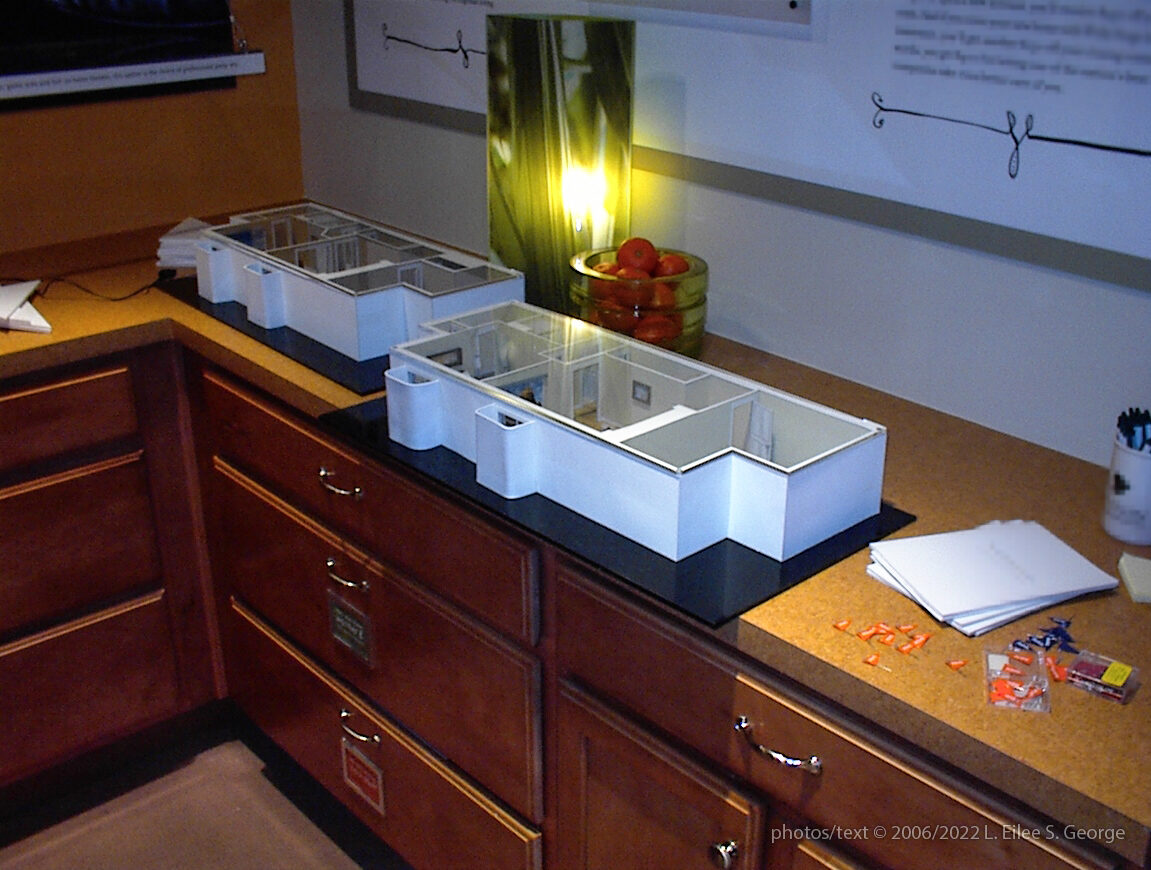
So…these up here are the two models: covers on, bases affixed, in their last photo before I drove them over to the client for display as sales models. Pretty, aren’t they? Pristine. I was SO proud of them, and everyone had finished and gone home, and nobody saw them all dolled up and done, ready for their debut.
I got to the builder’s sales office, and the one lady exclaimed, “How neat are these!”, showed me where to place them, and went about her sales duties while I set things up and wiped my fingerprints off, finding the right places in the spotlights to show off their best features. Of fanfare. No fawning. No fond farewell.
I was SO sad to let them go!!! I’d worked on them every day for oh, maybe three months or so, lots of overtime and care. It’d be like, for me, adopting out a kitten–as if any of them were expendable! I want to keep ALL the kittens!!!!!
Oh. I am so all over this thing. My work is me: my attention to detail, my skills, my solutions…but this pair, it had my personality.
So this isn’t just a documentary of mechanical fabrication of a product to market.
It’s a love story. An all-out, unrequited-heartbreak, never-see-them-again, rip-your-heart-out story.
Or at least MY heart….
Here’s a different view of the same bedroom/cork floor model. I think this was taken earlier: I’d gotten confused from flat plans on which way the stairs went (it’s just a bunch of stripes); I thought the door on the other end was to an under-stair closet! (To be fair, I’d lived many places with such closets.) From this angle, you may notice there’s a distinct difference back there in the bathroom: no curtain, but instead a sliding glass door. I’d forgotten about that. Styrene and Plexiglas comprised that. Something that size, we used about 1/32” Plex if we could get it, otherwise 1/16”. This was yet another change order from the architect. Maybe they couldn’t source doors for that size opening, I guess. Maybe it was budget…I’ll never know. Personally, I prefer curtains to sliding doors because it’s just easier to clean the place1
Of course, I use the terms Plexiglas and acrylic here interchangeably, much like folks do with “facial tissue” vs. “Kleenex”. Know that either way it’s gotten pricy. There are suppliers specifically for these plastics, in most cities, and some will cut it to size for you or even laser-cut from your draftings (because of troubleshooting in the end it’s easier to cut in-house, once you get past the initial cost of a laser cutter)–of course for a fee. I find their shops–much like I find hardware stores and model supply places–to be as stimulating as a candy store! I geek out because I truly love it.
Note that the cost of many model materials only underscores the wisdom of doing sketch models–or really scrutinizing everything you do to the utmost, as you do it. Chip board is a common material for sketch models, and so is foam core. Choose whatever’s closest to the thickness of the materials to use in each area of the final, or finish, model. Disclaimer, I did not do sketch models for every project; it is your choice. Some students feel more confident after having done some. You can also do them simply as context models (less detailed but show the surroundings of your main project).
Yes, it’s more time to do a sketch model. But usually such time should be built into the contract–it’s by job, not by the hour. Experience guides you on that charge, and on your need for sketch models: mistakes cost you. Of course that doesn’t help with client change orders…but designers of all types know THAT dance.
Here’s roughly the same view on the other model, with the hardwood floor and the peninsula, and those barstools! They came out well, sturdy as could be. Well, for something super-glued (this kind of glue is notoriously brittle and why things should not be handled roughly). For more flexion you can use an epoxy, but it’s hard to mix and apply discreetly. And cleanly with such a thick viscosity.
Note the shower curtain rather than the sliding doors in this one. This was a point of back-and-forth; the curtain won. I was sad, since I’d cleverly used I-beam from another scale as framing for those doors, so that they actually slid (too bad it’s not animated; see the previous frame for the door).
Back in the bar area, the little thing hanging on the wall is a beautifully detailed “clock” that was actually a fancy button!
I repurpose many things as I’ve mentioned, generally more in dollhouses than in professional models, but thinking outside the box is essential.
I used needle-nose pliers and bend paperclips into clothes hangers and reading glasses.
I took caps of acorns, file the stems off/flat, invert them and used them for knitting baskets, with “yarn of rolled up bits of embroidery floss, and two straight pins sticking out at odd angles, suggesting knitting needles.
I separated that embroidery floss to half its bulk and did tiny little embroidered lazy daisies onto a wee lace-trimmed pillow I put on one of my dollhouse beds. In that dollhouse I used a trimming of Grandma’s tatting (lacemaking) as a doily.
I wrote teeny little letters by hand on thin paper and place them next to teeny little envelopes I folded and “addressed” and “stamped”. And I mean teensy-weensy!!
My eyes aren’t what they used to be, but now I have a jeweler’s loupe (magnifier), and I could paint a scene on a grain of rice I swear.
All for love of the craft.
I can’t even stop writing about them I loved them so.
And here they are and there they were, nearly as I left them, gone, bu-bye. Mine nevermore–except my DNA is in them, with my own personality and care, every bit as much as my blood, sweat and tears.
Folks, artists put pieces of their souls into their work, and let each go, as others take it away….
Never treat that as worthless.
That object…sometimes…it’s a person. Treat it with respect. Know it forever holds the stamp of their essence.
It’s not just a sales tool. It’s part of them, part of its time; part of our culture.
This is like the difference between existing and living. Not just making a living, (in order to make more art)…
Meaning. Integrity. Caring.
It doesn’t matter what you create: a model, a painting, a meal, a child, a home, a book, a film, a song, choreography, a community.
It’s you.
It’s them.
It’s us. It’s all of us.
♥ – Eilee
All content on this site © 2013 – 2022 through the present year/ongoing